Time Lapse Movies
Introduction
Time Laps movies are situated somewhere in-between action photography (more than 3 pictures per second) and normal movie recording (around 24fps). The pictures themselves are recorded in a much slower pace compared to action photography, typically in the range of seconds between each frame, but the end result is not a single frame but a movie. I.e. the recording is taking single frames which are later merged into a movie. The slow recording and the fast playback means that motions are extremely accelerated and movements which are not usually noted will suddenly become clearer. The build up of cumulus clouds will normally not be something to look for, as the motion is relatively slow and such not that interesting. In a time laps movie however, the whole actions looks totally different and will catch your eye.
Approach
The main feature of time laps movies is the acceleration factor. If you record one picture every second and will merge these photos into a movie with 30fps (frames per second), the acceleration factor is 30, i.e. the movement will be 30 times faster than in real world. If you are now extending the interval to 10 seconds, the acceleration will be 300 times. Inversely, the length of the final movie will be shorter the higher the acceleration factor. For one second of movie, you need 30 pictures. Exposing every second will take you 30 seconds of recording for 1 second movie. If you expose only every 10 th second, the recording time will be 10 fold, i.e. 300 seconds or 5 minutes for one second movie. As you can see, it takes quite some time to record a nice movie and it will also require a high amount of pictures. Let's assume a short movie is 30 seconds long. This will require 900 pictures with 30fps for the final movie. With a 30 time acceleration factor it will take 300 seconds (5 minutes) to produce this movie, for a 300 time acceleration factor it will take 50 Minutes…
You have to be careful selecting the correct interval time for your movie. It depends on how the objects will move across your picture. If clouds are your subject select shorter interval times the longer the lens and the smaller the area captured. If you record with a wide angle lens from a high vantage point, use 10 seconds interval for slow moving clouds to start with. If you record street live a shorter interval would be more appropriate. Recording the suns path through the sky will call for much longer interval times, let's say between 30 and 60 seconds. This will increase the time required to record the movie dramatically.
The settings on the camera should be set manually. First of all, select the exposure time and aperture. You should double check not to overexpose and give some headroom for light changes. The exposure settings should be kept constant throughout the whole movie. Changes in 1/3 rd exposure time or aperture are very well noticeable in the final movie. It is therefore best to use a totally manual setting. Use JPG mode to record the pictures, RAW will eat up too much memory. It would also be very cumbersome to work through hundreds of RAW files for one movie. I normally use a relative high resolution setting of my camera. But if your camera has a higher resolution it probably makes no sense to record more than 10Mpixel pictures. Why then using anything higher than HDTV resolution. Well, it gives you the possibility for a final crop and why not record in higher quality if possible. It takes quite some time to produce a time lapse movie and overshooting a little bit with the quality is not such a big issue. If you are able to use a low resolution RAW mode, such as some of the newer cameras offer, this is something to think about. I often see limitations in final image adjustments with jpgs, RAW will give you definitively more headroom but you normally don't need the resolution.
The question around the white balance is not an easy one. I normally fix the white balance with the same idea as for the exposure variations during the movie. However, white balance changes will have much fine steps and will not be noticeable in the final movie. It really depends what you want to show with your time lapse movie. If you would like to record the light variations in the evening, it probably makes sense to fix the white balance. I also don't like the idea that the camera will change the white balance when a cloud bank passes the scene. I therefore generally fix the white balance.
The distance setting should definitively be set to manual as you will probably do not want to change focus during the movie. The lens's aperture will be closed and opened for every exposure. This does not really make sense: you could easily use a lens with manual aperture control such as older manual lenses mounted with an adapter to your new digital SLR. Said this, I never had any problems with my lenses recording too many pictures for time lapse movies. And I do not really like the idea of carrying aother lens just for time laps movies. I therefore use my regular lenses.

Equipment
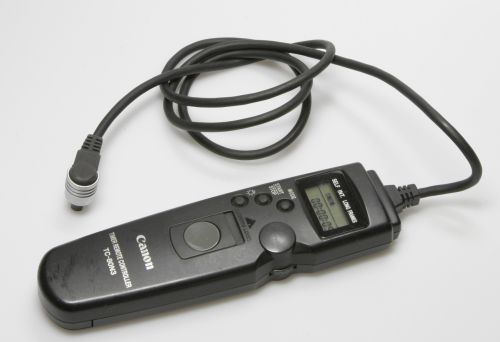
One basic item required is a timer. You probably don't want to sit behind your camera for hours exposing every 10 seconds. This can easily be done using an interval timer which allows you to set the interval time and the amount of pictures (intervallometer). I normally set the amount of pictures to infinity and will stop the recording as soon as I think that there are enough pictures to produce a decent movie. Oftentimes you will also have to stop the movie because the weather changed not the way you planned or anything else happened. I use the Canon TC-80N3, which is a relatively expensive but very reliable device. I'm impressed about the battery life time of this device. I own it already for more than 5 years and used it for more than 50´000 exposure and never had to exchange the battery. The benefit of the TC-80N3 is, that it allows you also to set exposure times if you set your camera to bulb. This is required if you like to record longer than the longest time settable on your camera (30 seconds for Canon models) for example when exposing the night sky. There are multiple companies offering timers, a very professional solution comes from Mumford Micro Systems called Time Machine. It is also possible to use your laptop for remote exposure control. But this is not a very handy solution probably also requiring AC for longer recording times. I would therefore strongly recommend buying a timer. Some compact cameras such as the Canon G9 allow direct recording of time lapse movies without the use of external Software, i.e. the camera will automatically create the movie for you. The flexibility is more limited, sometimes it is for example not possible to choose the interval time and the acceleration factor is therefore fixed. The Ricoh GX200 compact camera however, allows very flexible interval settings with its internal timer. I'm using this camera now more and more because it's so easy to handle.
This means, that you are very flexible using a digital SLR. The problem is the lifetime of the camera mechanics. A SLR camera will lift the mirror, open the shutter, expose, close the shutter and lower the mirror for every exposure. This is a lot of mechanical action and you can imagine that this is not totally lossless, i.e. the lifetime of your camera will be degraded by using a lot of exposures (on the other hand, that's probably the reason you bought the camera for). When I bought my Canon 20D there was no specification for shutter lifetime (which seems to be the most critical part in the camera). Now I know, that the limit is 50´000 exposures, mine broke about 30 exposures earlier. I have now the second shutter, the repair was around 200 Euros which I think is quite reasonabl but the 2nd shutter broke after an additional 30'000 exosures. Today's digital SLRs will come with a shutter life time spec and the numbers seem to increase with every newer models (I have seen numbers up to 150´000 for the non professional models; the professional models are specified to even higher numbers). The compact cameras are much less prone to excessive usage, as they do not have so many mechanical parts. My Ricoh GX200 has already more than 90'000 exposures without any failure (spring 2011).
When recording longer sequences I would recommend using either an external battery or an AC-adapter. You might either buy one or build one yourself (refer to my article on external power supply for instructions). When using the internal battery, use all the options to decrease power consumption. This means switching of all the automatic processes, you don't need them anyway) and also switch off the back display. I reached more than 1000 exposures on a single battery on the Canon 20D which is exceptional and really useable for short movies.
Recording
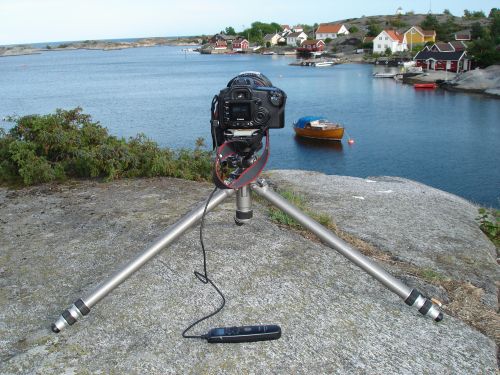
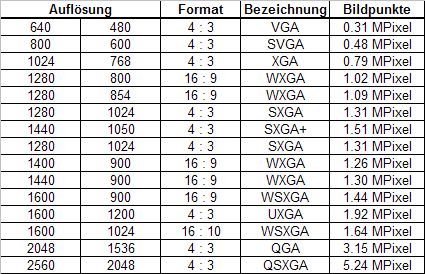
For the recording the camera should be mounted onto a good, solid tripod. The framing should not bee too tight to allow objects to move also in areas not thought of. You can still crop the frames during the processing step. As mentioned above it makes sense to record with relatively high resolution to give enough room for later cropping. If you are heading to fill a computer screen, you need something around 1600pixle width for a relatively large panel. But things change really quick and today's standard resolution might be small compared to future ones. Again, recording with overhead makes sense. Find below a table with standard resolutions, the aspect ratio (which is 2:3 for digital SLRs) and the total number of pixels.
Recording in jpg format allows more than 1500 pictures on a single 4GB flash (see table below). If you would use RAW (calculated for my Canon 20D), the card would be full already after 400 exposures. Even the smallest resolution would give you enough for most screens, but as mentioned above to go for more doesn't hurt; and today a 4GB card is not a huge but rather a small one (when I bought my 20D the 4GB card was the biggest one you could get). As said earlier, some newer models allow to record RAWs in smaller resolutions. For example the new Canon 5D Mark 2 allows choosing between three different RAW file formats:
- 5616 x 3744 (21.0 MP)
- 3861 x 2574 (10.0 MP)
- 2784 x 1856 (5.2 MP)
As you can see, the smalles format would give a good amount of pixles but size is sill the double of the higher resolution jpg I create with my 20D. But usinga 16GB flash on he 5DMk2 would allow you to record more than 6000 small RAWS. In the table below I calculated with a normal compression factor of 10x (not quality level 10!). It is normally possible to choose between different compression factors on your camera. The specification will show you typical values and you could then make the calculations for your camera model. The RAW files are also compressed but lossless, i.e. there is no data lost. The compression factor of a RAW file is about 3.

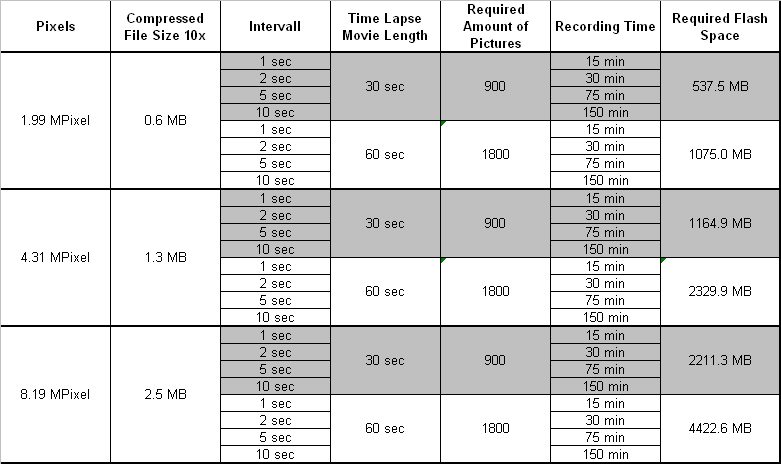
The next table shows you an overview for resolution, intervall times, length of movie, required exposures and required flash capacity for many different combinations. This table will give you a feeling about what is required to create a time lapse movie. As you can see, using approx 8 MPixel and a 1 second Interval would requires 900 pictures for a 30 second movie and will take 15 minutes to record and 2200 Mbit on your flash.
Composing the movie on your computer
After the recording of the sequence load you pictures onto your computer. You might choose to fine tune the colour, the saturation and contrast etc. Using a program that allows to synchronise between the pictures such as Lightroom makes life real easy. Alternatively using a batch is also possible. The problem with the latter is that you have to carry out all the steps with one picture and then check, if these corrections are OK for another picture from the same sequence. This is a forth and back approach. With synchronising in Lightroom you first start with an adjustment and then move to another picture and fine tune these adjustments going back and forth between different pictures and always synchronise. Only when the optimal settings are found, all pictures are processed. The same applies for cropping. If you do not have Lightroom, you might use a freeware such as Irfanview which makes batch cropping easy. You should crop into the final format required. If you use a digital SLR for recording the aspect ratio of your originals will be 2:3. If the movie should be shown on a Cinema aspect ratio LCD, you have to crop to a 16:9 aspect ratio.
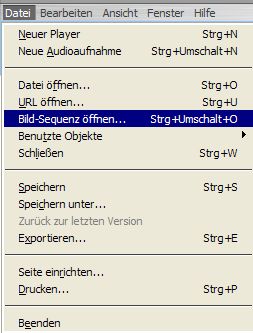
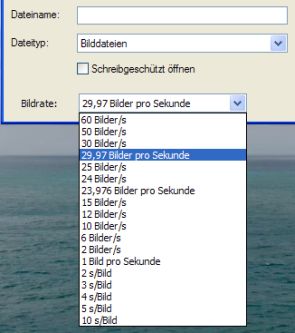
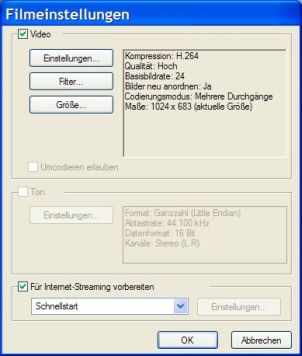
After the post processing, the single images have to be merged into a movie. I use Apple Quick Time Player Pro to do this step. There are other programs around that will allow you to do this step. I found that Quick time works quite easy and straight forward. The only problem is getting support from Apple. If you need help it's going to be a problem. My version for example doesn't save the movies anymore on the same hard drive where the single pictures are saved. I have no clue why this is the case, but I can save on another drive. I think there should be at least an e-mail where you can send a support request to, but I did not find one. My experiences with many other freeware programs are much better in this regard. Anyhow, creating a movie with Quick Time is rather straight forward. Choose open sequence, select the first picture of your sequence (your pictures should have ascending numbering) and select the fps. The processing takes some time. As soon as it is finished you can already see a preview of the movie. If the movie is not displayed continuously you should first save the movie and then start from the saved version. The movie is normally saved as a .mov file which is the Quick Time format. You can later export the movie into different formats. One nice feature is to export into a web presentation which will automatically create a title picture, the highly compressed movie and a html file to implement the movie. This will give you a fast start showing your movies on your web page.

My time lapse movies can be found on this page: Time Lapse