Digital Panorama Photography
Introduction
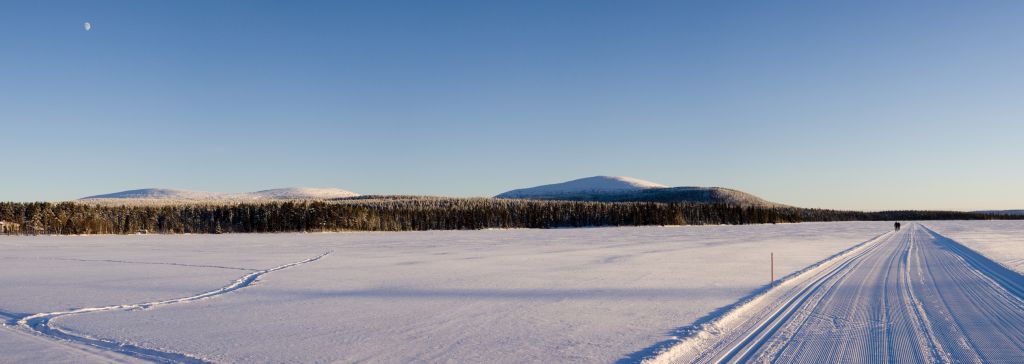
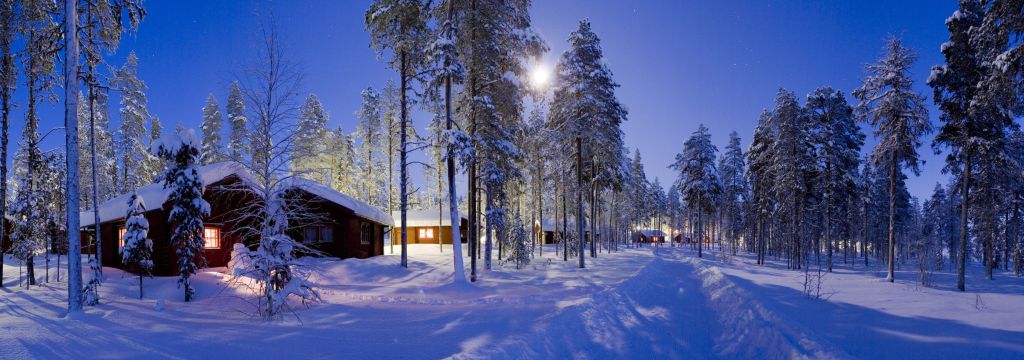
This article describes methods and techniques used to create panoramas from several digital images. I will cover the hardware and software that work best for me. I will not cover panoramas from analogue cameras; however, scanning the analogue negatives/positives will give you a very similar approach.
The first time you try to create a panorama you will probably experience some problems trying to stitch the pictures together on your computer. The reason may be uneven exposure, uneven colour temperature or shifted pictures due to camera movements during the recordingprocess.
Panoramas without tripot
If you're trying to record a panorama without a tripot, i.e. hand held, you should keep the following in mind:
- set the exposure on the camera manually
- fix the colour tenperature for all photos to the same level (not critical if you record in RAW mode)
- keep the focal length constant
- try to keep the camera on a fixed location or even better: try to turn the canera around the nodal point (details see below)
- omit close by objects as they'll have the biggest paralxe which is hard to deal with if the camera is hand held
Exposure
To find out the optimal exposure setting for all photos within a panorama do the following: Preset either the aperture or the exposure time and scan the whole area of the panorama while examining the changes of the exposure measurement. At the brightest location check the exposure setting and set the measured value manually. Then record a picture and investigate it for overexposure. If you'll find severe overexposure change the exposure setting accordingly. The exposure time is now valid for all the pictures of the given panorama. You'll soon discover that the dynamic range of exposures within one panorama is a limiting factor. Especially for wide panoramas the dynamic range can be the killer. You may try to avoid too bright areas by not including the sun in one of the pictures. Perhaps it is required to hide the sun behind an object, a tree for example. The aperture should be selected such that the depth of field is appropriate.
As overexposures of digital sensors always lead to ugly white areas they should be omitted, i.e. proper lights are more important than details in the shadows. Be careful with the histogram of the camera, as it is generated based on the jpg picture calculated by the camera processor and not on the RAW file itself. If you are recording RAW (and this is strongly recommended) the usable dynamic range is higher than what the histogram will tell you. For my camera, I can overexpose by at least half an aperture setting and be still able to correct it later on in the RAW converter using 'highlight recovery'. You have to find out yourself what is applicable for your camera model. Be aware that even within several camera bodies of the same type differences are possible. I found that CMOS sensors handle overexposure better compared to CCDs. My experience is based on the Canon 5DMK2 and the Leica M8; the latter uses a Kodak CCD.

As mentioned above you have to set the colour temperature for all pictures manually. Either you find the optimal setting with a test exposure (taking a picture of a neutral grey tone) or you use the camera presets. If you're shooting RAW the 'as shot' value is not terribly important as you can change this setting later when importing the pictures with your RAW converter. Keep in mind to use the same value for all photos of the panorama when importing. The 'as shot' value is often a good starting point for the RAW conversion. My experiences show that it is a good idea to leave the camera settings on automatic and then use this value as a starting point for RAW conversion.
Panoramas with a tripot
If you're getting more serious about shooting panoramas you should use a tripod, especially if you want to manage the parallax problem for nearby objects. Those objects always show the biggest parallax compared to the one of objects further away. Panoramas of indoor scenes will always include nearby objects and it is very difficult to create an indoor panorama without a tripod with a calibrating mounting platform.
- The tripod and its head should fulfil some basic requirements for the use in panorama photography:
- The rotation axis of the camera-lens system needs to be adjustable (shift) such to align the nodal point exactly in the rotation axis.
- The rotation platform needs to be easily adjustable to be parallel to even ground (horizontally parallel, at least for horizontal panoramas), i.e. parallel to the panorama long side.
- The camera should be mountable in horizontal and vertical direction without the need of recalibrating the rotation platform.
There is a wide variety of products available which will all fulfill the above mentioned criterias. The possibility of mounting the camera either in vertical or in horizontal position will give you the flexibility to have a greater angle of view in the vertical axis when the camera is mounted vertically. In 90% of all panoramas I have the camera mounted that way. In addition to the bigger vertical opening angle the whole panorama will have a higher resolution as more pictures are required to cover the same panorama angle compared to the horizontal format. The easiest way is to use an L plateon the camera which functions at the same time as a quick release plate for the tripod head. The Really Right Stuff L plate is a really nice design, as the plate is optimised for each camera type. Each camera body type will have its own L plate which is very tightly fixed to the camera. The slim design will allow the plate to be constantly mounted on the body without having a big impact on camera handling. With such a plate it is now easy to mount the camera either vertically or horizontally.


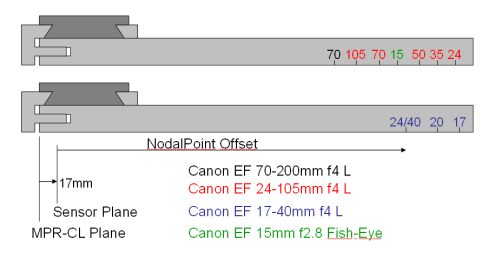
To place the nodal point of the camera-lens system in the rotation axis of the camera head a plate is used to shift the camera forwards/backwards versus the rotation axis. The nodal point of the camera-lens system is the point where all rays from the object towards the sensor meet. I use the plate MPR-CL (see the picture above, left) from Really Right Stuff. The plate can be shifted in the Arca Swiss Quick Release Clamp (see the picture above, right); the camera is mounted on the plate using the clamp at the left hand side of the plate (see picture below). I earmarked the different settings for different lenses and focal length settings on the plate. Another possibility is to use a dedicated macro rail which gives you more control over the shifting procedure but is also a little bit heavier and slower to operate. I think that my solution gives me enough control when setting the optimal offset. However, the plate I chose is a little bit too short as you can see (the markings for the 17-40mm lens are located on the far end of the rail).
The search for the nodal point
Finding the correct nodal point for different focal lengths and different lenses is critical in panorama photography. Turning the camera-lens system around the nodal point will not generate any parallaxes in the different pictures and a correct stitching is possible. The parallax itself can easily be observed by looking through the viewfinder while turning the camera.
First of all, be sure the camera is absolute parallel to even ground, i.e. mounted horizontally. The equipment needed for levelling out the camera is described later in this article. The easiest way is to use a panorama turntable on a ball head. In this case only the turntable itself needs to be levelled out. If you are using a traditional ball head, first level out the ball head base and after that the mounting plate of the camera.
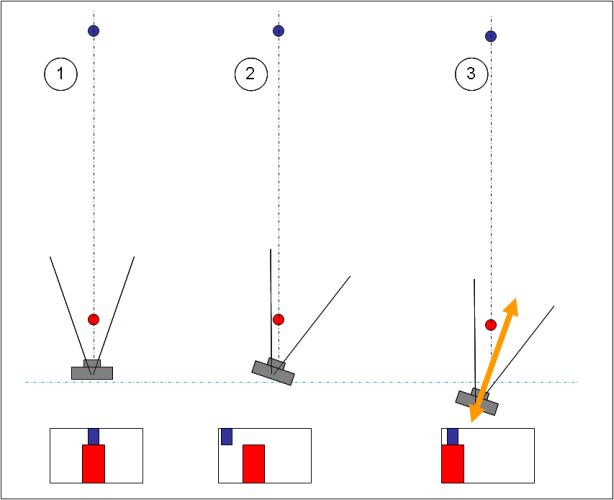
To find the nodal point of the camera-lens system, a set up with a high parallax is used. Place a near vertical line in the same viewing direction as a distant vertical line. I used a transparent tape with a black line on it which I glued on a near window (approx 2m away from the camera) and adjusted the camera such that the black line was superimposed on a 200m far away telegraph mast when looking through the centre of the viewfinder. You might have to close the aperture manually to see both objects sharply enough to line them up. Keep in mind that the camera still needs to be levelled. If you now rotate the camera to the left or right you'll see how the superimposed lines will divert. The parallax is biggest on the far end of the viewfinder. Having the wide side of the viewfinder horizontally will give you a larger angle to play with. If the two objects stay exactly superimposed you have already found the nodal point of the camera lens system. If not, turn the camera until the parallax is biggest (at the far end of the viewfinder) and now shift the camera back and forwards on the plate mentioned above until the two lines are perfectly lined up. If you are now turning the camera around again, there will be no shifting of the two lines anymore and you have found the nodal point for that specific camera-lens combination at the used focal length. Continue with all other lenses and focal length settings you are planning to shoot panoramas with. Mark each position on the bar for all different focal lengths tested. The nodal point for a specific focal length might vary from lens to lens due to different optical constructions. As you can see on the picture above, I marked up to 5 focal lengths for the 4 lenses I use.
The approach is graphically illustrated below:
- The near by (red) and the far off (blue) line are superimposed in the viewfinders centre.
- The camera is turned until the objects show the biggest parallax.
- By shifting the camera back and forwards the two lines are superimposed again, the nodal point is found.
As described above, I'm using the Really Right Stuff Rail MPR-CL, where MPR
stands for multi purpose rail. This rail will be used for panorama photography clamped into the Arca
Swiss clamp of the ball head. The rail can now be moved within the clamp to the correct nodal point
of
the specific lens and focal length used. The Arca Swiss clamp of the ball head has an index marker
in
the centre of the clamp that can be used as a reference (see picture below). Markers on the rail
will
now show focal points of different lenses and different focal lengths for the lenses used by you.
This
is illustrated in the figure below and can also be seen on the picture of my MPR.CL shown above. I
am
mostly using 4 lenses for which I have found the nodal points for different focal lengths. These
lenses
are:
- the 15mm f2,8 Fish Eye,
- the wide angle zoom EF 17-40mm f4 USM L,
- the standard zoom EF 24-105mm f4 USM L and
- the tele zoom EF 70-200 f4 USM.
When I measured the lenses to find the nodal point I was surprised that for most lenses the nodal point is very close to the front lens rather that in the middle of the optic assemply as anticipated. The camera lens system is therefore rotated around a point in the near vicinity of the front lens which is important to keep in mind when shooting panoramas hand hold. In this case, one would intentionally rotate the head or the whole body to move to the next picture for the panorama. In this case, the rotation point would be off by at least 30-40cm. One should try to rotate the camera lens system around the front lens which means moving your head to the left when turning the camera to the right. This is a little bit an unusual movement but this should help to bring the rotation axis closer to the nodal point. It is dependent on your lens and camera whether the nodal point is close to the front lens, but I guess this will specially be the case when using SLRs with wider angle and therefore short focal length lenses.
Below I have listed the values found with my Canon EOS 20D and the 4 lenses mentioned above. All distances are noted relative to the plane of the sensor. This plane is marked on most SLRs on the top of the camera body. Normally it is not important to note the distance relative to the sensor plane, as you will measured the nodal points directly with your rail and note the values found on it directly as I did (see the picture of my MPR-CL above and the drawings of the rail below). However, if you are using another camera with the same lenses and are using another L bracket on your camera, the distances from the end point of the rail could be different for your rail. I have therefore noted the distances relative to the sensor plane which should be equal for all cameras when using the same lenses. You are welcome to use the values that I have found for your system. I have compared the values found by myself with others distributed on the internet and they seem to fit with what others have found. The difference for the end point of my MPR-CL Rail to the sensor plane is 17mm as shown in the drawing below. I' m not sure if this value is equal for all cameras equipped with really right stuff brackets, you have to test this therefore for yourself.
Levelling and recording the panorama
To level the ball head base I use a Gitzo levelling unit called G1321 which is shown in the right picture below. First, the base of the ball head is levelled. After that, the Arca Swiss mounting clamp is levelled using the ball head itself. The built-in spirit levels are simplifying this job (see picture below, left hand side) and the levelling can be carried out very precise. If you have a panorama turn table, the levelling is just required for the panorama turn table itself. In this case, the levelling is carried out using the ball head, which is a very easy and quick job. If you have angular degree marks on the head, a panorama can be shot with even more ease. When using a standard ball head without a panorama turn table as I do keep in mind that it is required that the ball head will require separate controls for the ball head and the horizontal rotation axis.


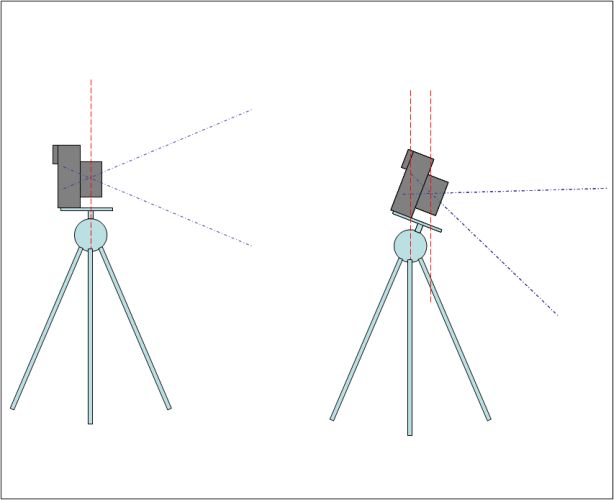
It is very important to always level the camera on the tripod. Such, the horizon will always be in the middle of the pictures. If you whish to shift the horizon do this by later cropping in the computer rather by tilting the camera back- or forwards as this will shift the nodal point of the camera-lens system out of the vertical rotation axis as shown in the picture below. It would be possible to find a new nodal point setting for specific camera tilting angles but this generates a whole lot of earmarks on the panorama plate and makes it very confusing to use. I suggest you start with horizontal settings only and find out for yourself if more is required.
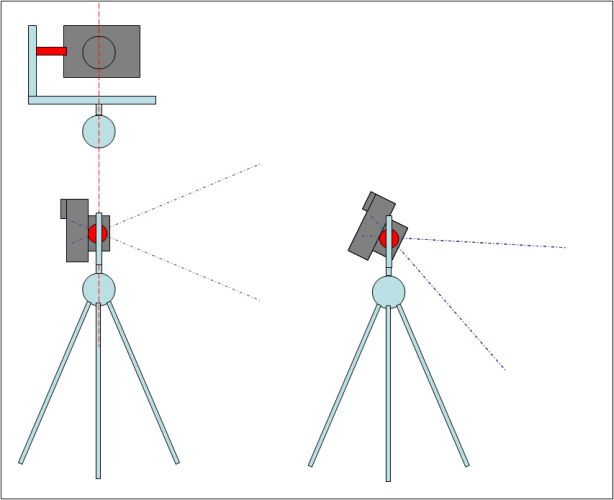
If you plan to do multi row panoramas or plan to shift the horizon frequently out of the centre of the picture you should think about a special mounting that allows these shifts. On such a mounting, the camera is fixed to an additional plate which can be rotated around a horizontal axis which will go through the nodal point of the camera-lens system. This plate is mounted using an L construction on the turn table with the vertical axis going through the nodal point. This mounting is more complex, heavier and also more costly. I'll not go into more details here, but you'll find some drawings below.
When recording, the separate pictures should overlap by a third to make accurate stitching possible. Too much overlap is not a good idea, as this might confuse the stitch software.
Stitching the separate pictures into a panorama
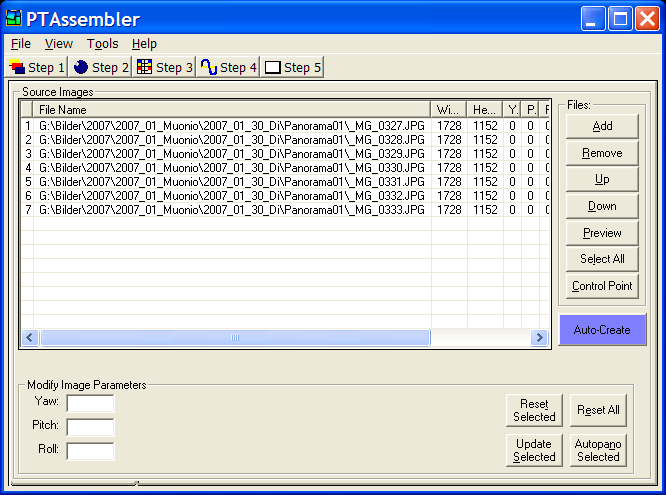
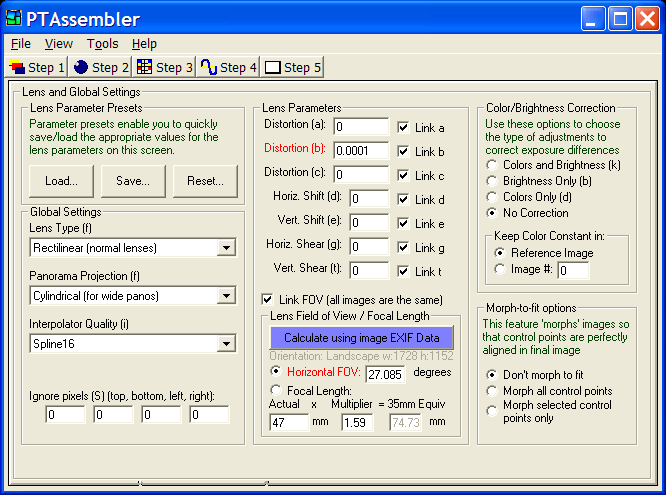
After transferring the files to the computer, all pictures are adjusted and tweaked the same way in a photo editing program. Either use a batch process or synchronize the changes for all photos of a certain panorama. After that, the photos are imported into a stitching tool. I use PT Assembler, which is a very flexible tool giving you a lot control but also offers a full automatic mode. With this tool, some plug-ins make life easier. Autopano will help finding the same areas in different pictures and map the pictures together. Enblend will blend the pictures into each other. This is required as each lens will show a certain degree of vignetting and therefore the exposure in the centre of the picture is always different from the exposure at the picture edges. Enblend will take care of these exposure variations and blend the panorama smoothly. To reduce vignetting, it is a good idea not to shoot with the lens wide open (at the max. aperture).
PT Assembler will automatically find the right order of the pictures. Even multi row panoramas are automatically detected. You may also generate 'normal' pictures which are stitched together from multiple files to give you a result with much higher resolution compared to the cameras 'one shot' resolution.
There are many different stitching tools on the market and I tried some of them but found that PTassembler serves best for me. The more care you take during recording keeping in mind all the points made above, the easier it is for the stitching software to create a pleasant panorama.
