Lens Coding Leica M System
Data transmission between camera and lens
A classical rangefinder camera such as the Leica M model does not require any data transmission between the lens and the camera. With analogue film, there was no requirement for such a technique, but in the digital age it is a standard feature, that all technical details about a picture are stored in the EXIF data file attached to the picture file itself. The rangefinder is totally different in its construction compared to a Single Lens Reflex (SLR) camera. And this is one of the reasons, why data transmission is widely spread on SLRs but not that common with rangefinder cameras. If you are selecting an aperture for example, you choose this directly at the lens itself. As one is not looking through the lens itself, it doesn’t matter if the aperture is closed or not. The finder is totally independent from the aperture setting and such the aperture is always set to whatever value is used in the picture taken later on. This is totally different using a SLR. Here, you are looking through the lens itself and it is therefore required t have the finder as light as possible to do your composition. The aperture will therefore not be closed until you take a picture. You are not dialling in the real aperture but only a position which will be used to take the picture. If you now press the shutter, the mirror will be lifted, the aperture will be closed to the pre-selected value and finally the shutter will be opened. The camera therefore needs to know the exact pre-selected value for the aperture, i.e. the aperture value needs to me transmitted from the lens back to the camera and during the shot the camera needs to tell the lens to close the aperture, i.e. there is a ‘data’ transmission between camera and lens.
But what about focusing? The situation looks totally different here. On a rangefinder camera you are actually focusing using the finder. As you are not looking through the lens, the lens itself takes no direct action in the focusing part. The lens will be coupled to the focusing mechanism, but very generally spoken you could even focus without a lens attached at all. Now you can see why it is so important to have your rangefinder focusing mechanism properly calibrated. But all this means, that there needs to be a focusing information transmission between the camera and the lens. This is not the case suing a SLR, at least not when focusing manually. As you are looking through the lens you are directly using the lens itself to focus your picture.
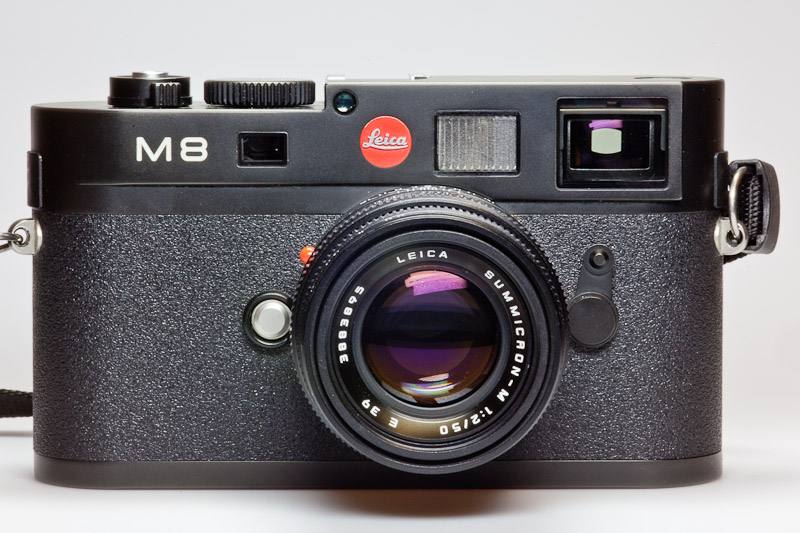
Lens and Aperture data
There are two main reason, why it should be interesting that the camera gets the information about which lens was used for a certain photograph and about what aperture was used. First of all, it is nice to have this data later on to analyse your picture on your PC. OK, that’s just a ‘nice to have’ feature. But secondly the camera or the RAW converter is able to use this data to correct for some optical ‘flaws’ such as vignetting, chromatic aberration (the different effect the lens will have on different wavelengths of the light) and the distortion of the lens (pillow and barrel). As some of these effects are dependent on the aperture, it is required to have the aperture information for every picture. For example the vignetting of a lens is very dependent on the aperture value as will be shown later in this article. But also other optical effects are dependent on the aperture, as using a smaller aperture i.e. one with smaller opening, will cut away the rays going through the outer part of the lens which is more effected by spherical aberrations than the rays going through the centre part of the lens. The camera or the RAW converter is then able to use a pre-programmed profile to calculate a correction for the specific picture.
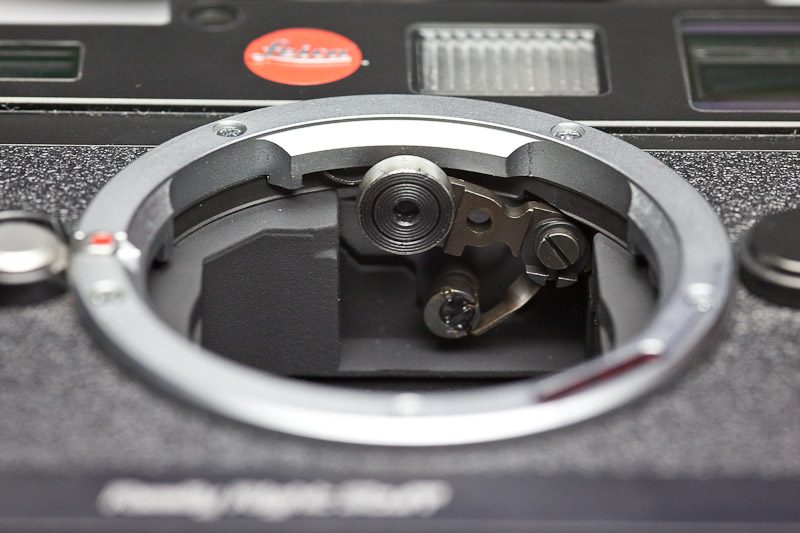
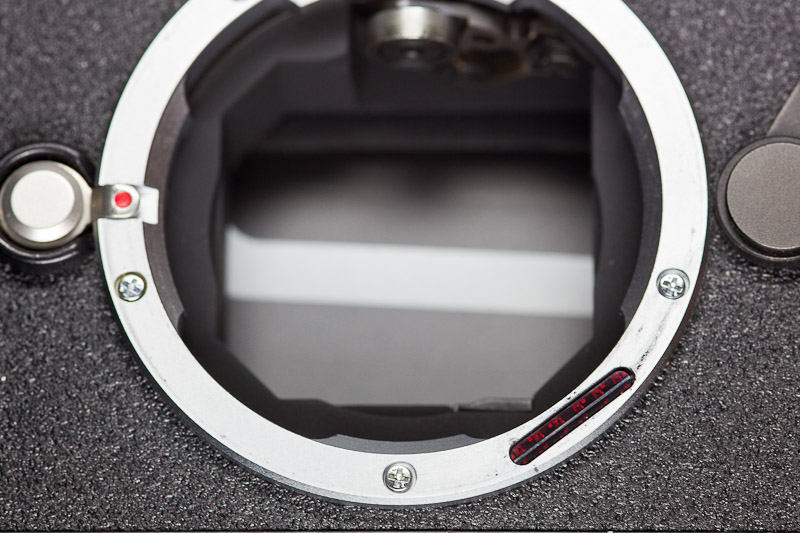
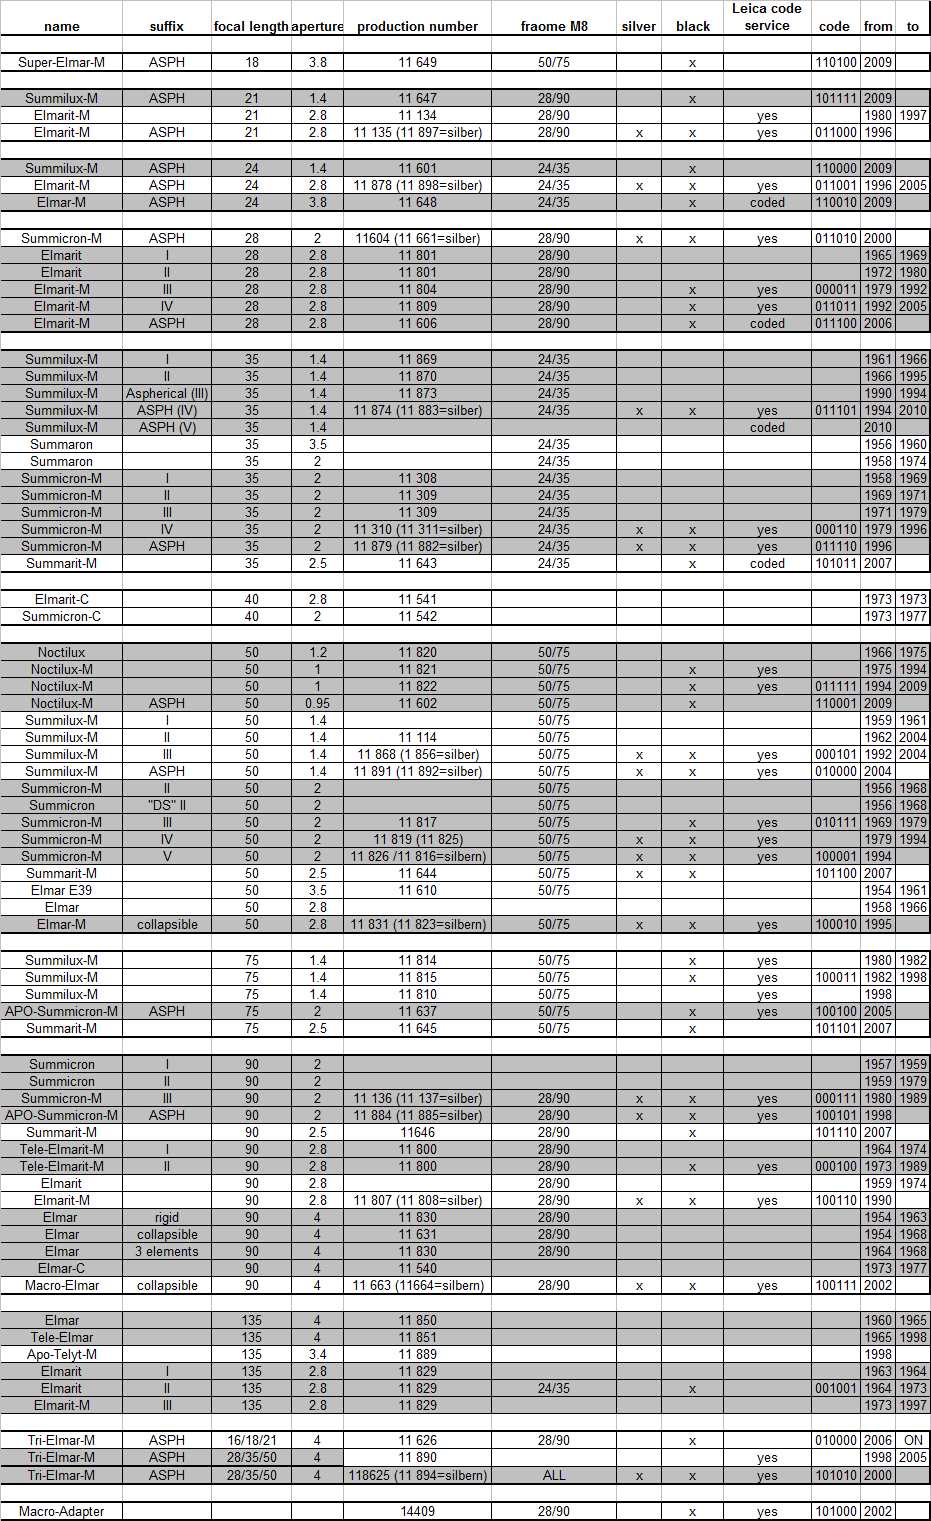
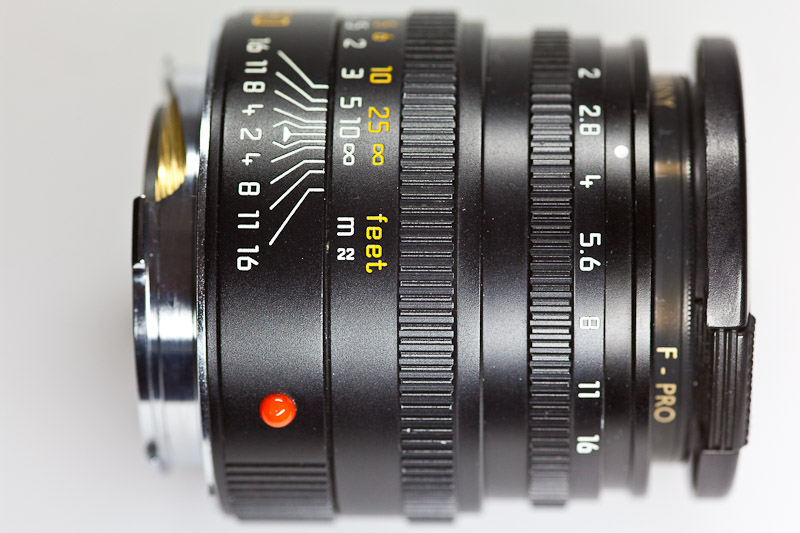
But how can all this data now be transmitted from the lens into the camera f there are no electronic contacts? We have to keep in mind that a Leica M body is able to work with lenses which are more than 50 years old. There is no electronic at all inside the lens compared to today’s lenses used for AF DSLRs (Autofocus Digital SLRs). These lenses are full of electronics, they have integrated circuits and electrical motors for the focusing and electrical driven apertures and some of them even offer vibration reduction (or image stabilization) techniques which will also require electronics. But the traditional Leica lens (and also other manufacturers rangefinder lenses such as Zeiss or Voigtländer lenses just to name a few) do not have any electronics inside, they are pure opto-mechanical constructions. That’s one of the reasons why they are so compact and lightweight. The trick is now to attach a 6-bit code to the lens’s bayonet. This code consists of six fields which are either painted black r white. The camera will be equipped with 6 LEDs and 6 sensors to read the information from the lens. As soon as a lens is attached the camera will measure the 6 fields if the lens detection is activated inside the camera. If there is no code, there is no information attached to the EXIF file to which lens was used. The M8 does not allow to manually setting the lens information, this is only available at the M9. One code is now dedicated to a certain lens type, i.e. not only the focal length information is coded but even a certain lens type. I.e. different generation of lenses will get a different code. A Summicron 50mm generation 3 will have a different code than a Summicron generation 4. But generation 5 is the same as 4, i.e. it seems like their optical construction is very similar and the corrections applied are the same. Not all lenses will get a dedicated code as there are only 6bits, i.e. 64 different codes available. Find the codes which I found in the list below.
If you are using a lens which didn’t get a code from Leica, you can still use one the existing codes and than apply a dedicated RAW-converter profile for that lens. You just need to tell the RAW converter which profile to use for which lens. The only thing which you cannot deactivate is the camera internal corrections applied. If you turn the code detection in the camera off, no corrections will be applied but then you also do not know which lens was used. I think this is a flaw in the software because if you do not want the camera to make any corrections you should be able to deactivate those. And why is the lens information not recorded even if there is a 6-bit code available if you turn the corrections off? Anyhow, you will probably find a code which is OK to be used with you specific lens. Only Leica lenses will get a code, lenses from other manufacturers will not get a dedicated code at all and therefore will also not come pre-coded. You need to add a code to the lens yourself and also keep in mind that the code selected was actually meant for another lens. All this is very confusing, but that’s the trade-off being compatible with lenses which are more than 50 years old. And as you are using only a limited number of lenses you will soon get used to all this.
The list below was compiled using different sources. One source was the code table that came with the match technical coder kid which I will talk more in detail in the text below. But not all of the information in that table seemed to be reliable such as production years and some of the lens production numbers. Therefore use Leica tables which they released to order codes for specific lenses to correct and extend some of the information. And finally I also had a look at official production number lists to get as much information as possible. The newer lenses released by Leica are all pre-coded and I do not have the information which code was used for them. They are therefore just marked as ‘kodiert’ (German for coded) in the table below. But if you have some codes which are not in the list, please let me know and I will complete the list.
To code lenses on you own
As mentioned above, not all lenses will get a code such as older Leica lenses and all lenses from other manufacturers, i.e. from Zeiss and Voigtländer for example. And all screw-on lenses have no code but there are special screw-bayonet adapters available which come pre-coded. For all lenses which have no code attached, you have the option to sense them to Leica (if it is a Leica lens and if the Lens has a dedicated code and they will code the lens for you. This service was offered for 90Eurosin 2006 but is now (2011) available for something around 250Euros. This is quite a high price tag if you just bought a used lens for e.g. 400Euros. But the coding done by Leica is very professional. They will not only paint the codes on the bayonet, they will mill small squares into the bayonet which will be painted afterwards. Such, they are not affected by mounting the lens on you camera; the paint will not touch the cameras bayonet counterpart.
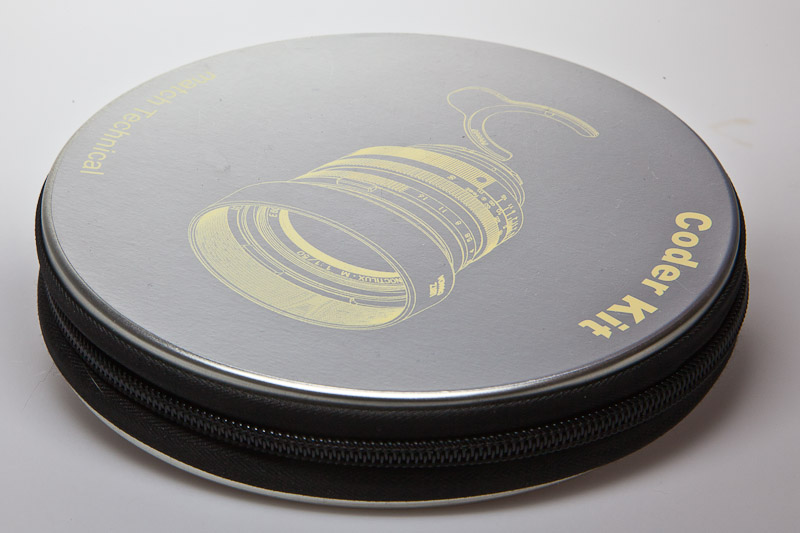
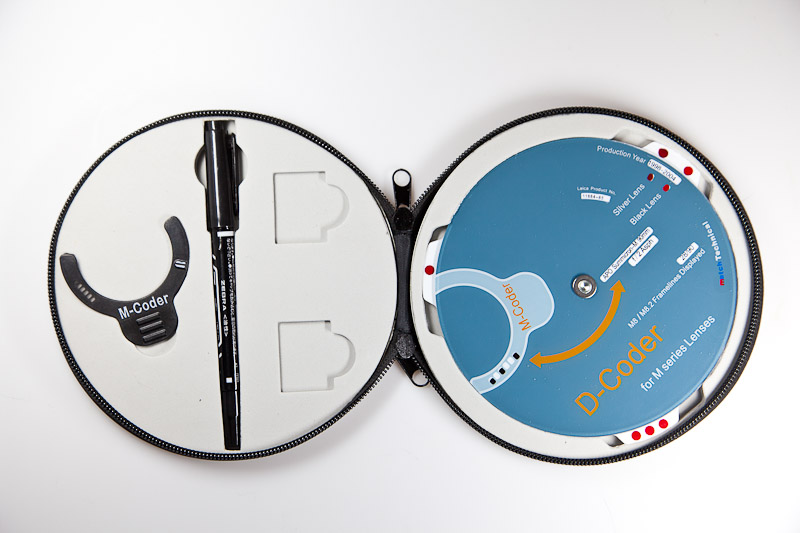
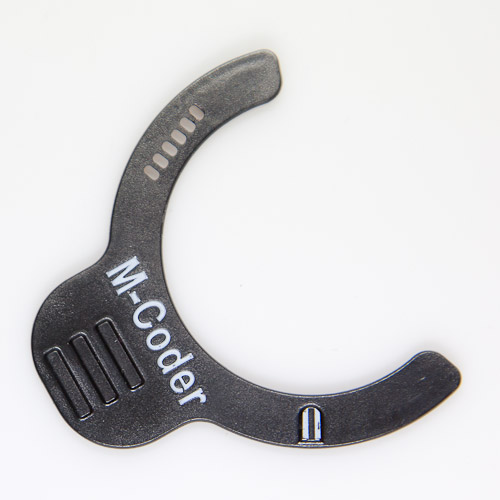
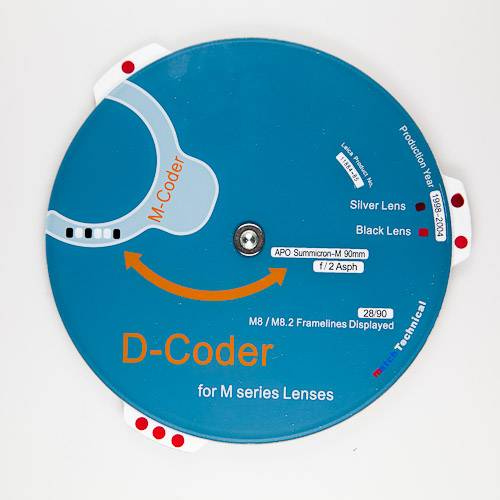
Another option is to use a water resistant pen and paint a code to the lens yourself. You have to do this for all lenses which have no dedicated code, i.e. all older Leica lenses and all third party lenses. You can either build a template for the code by yourself by cutting holes into a cardboard. But such a assembly will most probably be hard to generate such that is sticks exactly onto the lens. A much more robust solution will be the coder kit from match technical, which is a plastic template that sticks very accurately to your lens. The coder kit comes at a cost of around 70Euros. The coder kit comes with a table where you can find many codes for different lenses (part of the list shown above) and also with a double-sided pen. The thin end of the pen is used together with the template to transfer the code positions onto the lens. The thicker end of te pen can then be used to increase the width of the single code bars.
This code will not be forever. I have noticed deterioration of the code already after 3-4 lens changes, i.e. you will need to recode your lens from time to time. As this code is not a permanent one you will most probably have pictures where the code was not properly detected and the information is missing in the EXIF file. MY Summicron 50mm lens for example turned into a Summilux 50mm after a while (well, at least code-wise) which is a bad error because you cannot see it on the M8.The camera will just show you the focal length and not the exact lens used.
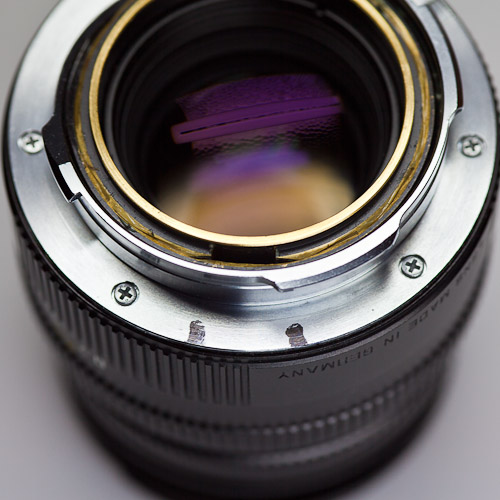
How is the aperture value transferred from the lens to the camera?
This question is relatively easy answered: It is not transmitted at all! The camera is only guessing the aperture used. It is using a second light meter inside the camera for this purpose. This second light meter is used to tune the light level of the LED block showing the shutter speed in the finder. This information can now be used to compare it with the measurement with the through the lens measurement. The latter is actually a measurement of the reflected light from one of the shutter blades which is painted in white (see picture above). But as the through the lens measurement is dependent on the angle of view of the lens used but the secondary measurement is independent of the lens used, it is questionable how accurate this measurement is.
I checked on the internet and actually found a site http://bretteville.com/m8metadata.html
(the
site is no longer available) where this question
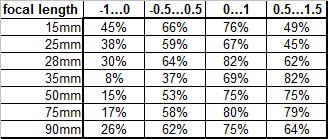
was raised already and where some investigations have been carried out. The list below shows some results which
I extracted from this report.

The report states that values measured with lenses attached that have a focal length between 28mm and 50mm are more accurate than others. But even for 35mm and 50mm lenses the measurements can be off by a whole aperture value. I took a closer look at the values measured and realized, that when a certain range (one EV, EV=exposure value) is given, a hit rate of 70-80% was reached. Interesting enough, the hit rate was not highest around zero but in-between 0-1EV, i.e. there is some room to optimize the algorithm. If the range is increased to 2 EVs, i.e. +/-1EV, the hit rate is even in the range of 90%. But even then, 10% of the measurements are off by more than one aperture value; not really a hype! But is seems that the pictures that show high offset are the ones which were taken in front light or when the sun was shining directly onto the 2nd sensor but the lens was protected by the sunshade. The hit rate is actually increased if the lens is coded. In this case, the camera knows the exact aperture range of the lens and can correct illogical results, for example aperture 1.4 for a Summicron lens. This will then be corrected to 2.0, the maximum aperture of a Summicron lens.

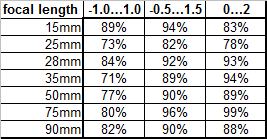
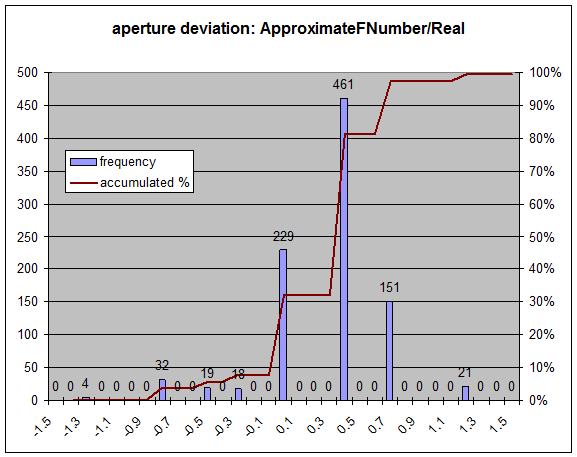
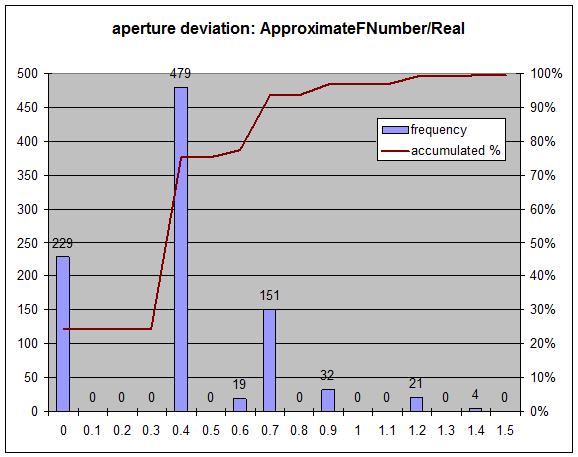
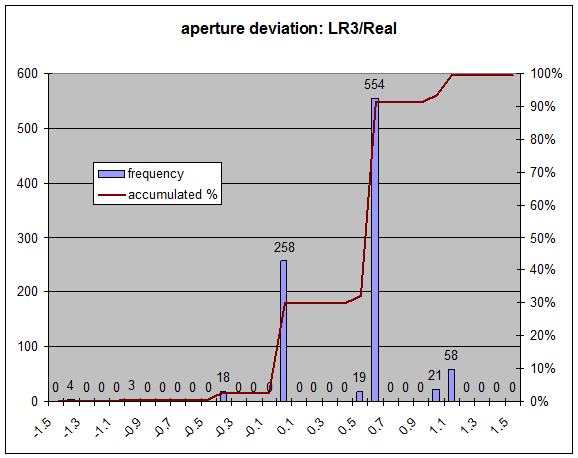
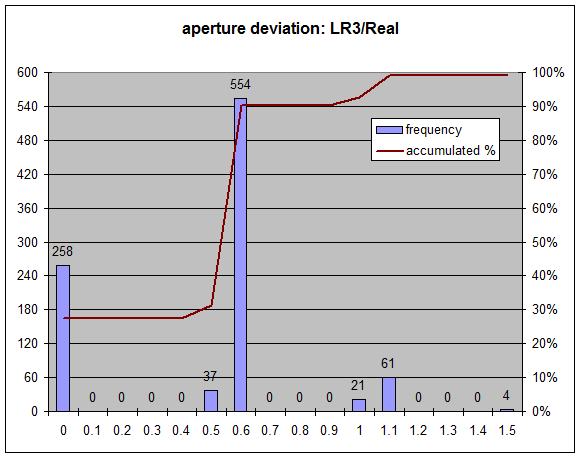
Photoshop Lightroom uses a different algorithm to find the aperture value. The Leica SW will actually write its vale into a parameter called approxFnumber, while Lightroom will write its value directly into the aperture parameter. The two values can therefore be easily compared. To find out if Lightroom uses a better algorithm to find the aperture value I recorded 940 photos where I manually noted all the aperture values and lenses used. All shots were taken during 2 days and it was mostly cloudy, i.e. there were no real front light shots. This means, that the hit rate should be higher than on sunny days. But as you can see in the graphs, Lightroom is actually using a different algorithm but not for the better. The hit range is approximately as good as Leica’s own algorithm. But the overall accuracy was better as expected. More than 90% of the shots were within 1.2EVs, but again shifted to higher values (i.e. not around zero).
What’s all this data collection good for?
As mentioned above, the recorded lens data and aperture values can be used to correct some optical ‘flaws’ of the lenses. Three main parameters can be corrected by SW:
- Vignetting: the lens will generate an uneven lightness of the picture: the corners will get less light than the centre of the picture; this effect can be quite severe even with highly corrected lenses and is often in the area of one aperture value
- Chromatic aberration: different wavelengths and such the different coolers of the three channels RGB (Red, Green and Blue) are effected differently by the refraction index of the glass used in the lens. One effect is, that the pictures of the different colour channels will generate pictures of different sizes, i.e. there will be colour fringes at high contrast edges, especially in the corners far off the optical centre
- Distortion: Pillow and barrel distortions will cause straight lines to be bend inwards (pillow) or outwards (barrel) at the edges of the picture
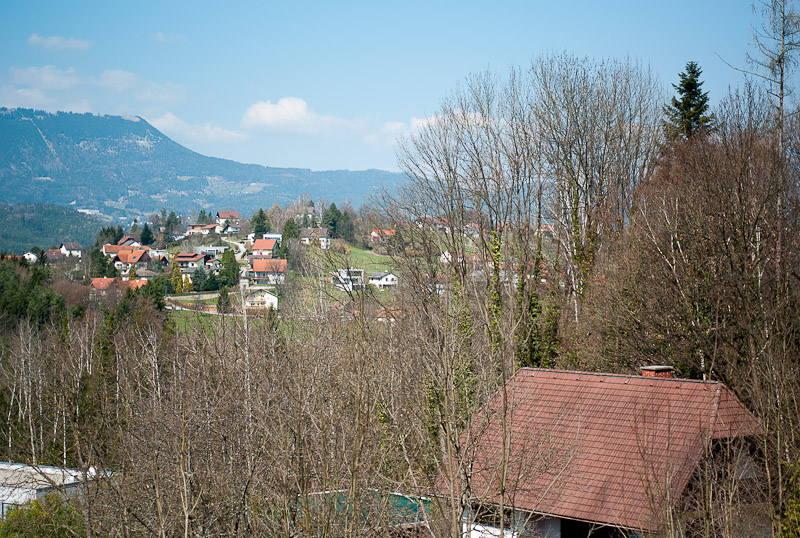
no lenscoding |
with lenscoding |
with lenscoding and
LR-profile
Summicron 50mm/f2.0 with and without lenscoding and additional LR profile
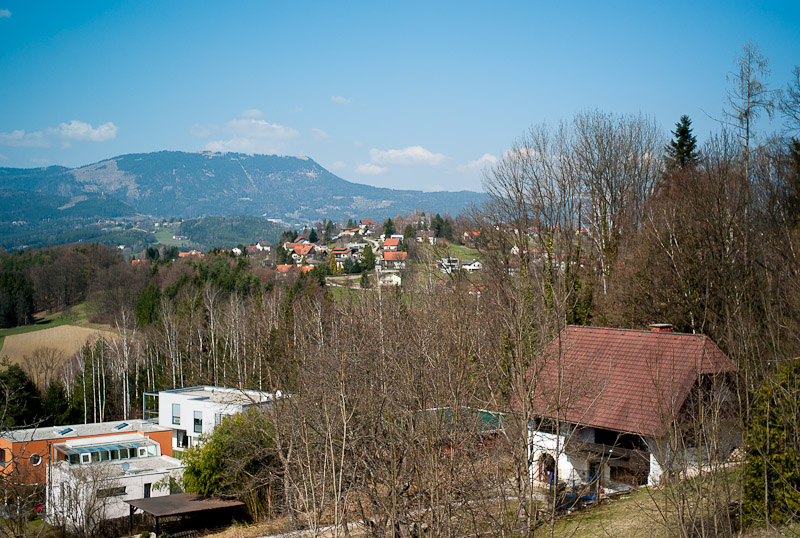
no lenscoding |
with lenscoding |
with lenscoding and
LR-profile
Summicron 35mm/f2.0 with and without lenscoding and additional LR profile
Especially vignetting will be corrected directly in the camera. The other effects can be corrected using an additional profile in the RAW converter, for example in Adobe Lightroom an Adobe Camera RAW. There is special software from Adobe, the lens profiler, which allows creating a profile for any camera lens combination. This involves taking many pictures at different apertures and at different distances from a pattern chart. Out of all the pictures, the software will calculate a profile that includes chromatic, aberration and vignetting corrections. It is clear, that all the corrections will be minor for a good lens. I created a profile for three lenses that I own, the Summicron 35m ASPH, the Summicron 50mm V (current model 2011) and the Tele-Elmarit 90mm (an older lens). The first two lenses show no chromatic aberration at all and the distortion is almost neglectable. As you can see from the animated pictures below, the distortion for these two lenses will not be touched by the M8 internal calculations. The Tele-Elmarit shows very little chromatic aberrations and the distortion is also very small. Bit the vignetting is significant on all three lenses and is nicely corrected in the M8 and even better using the Adobe RAW profile. The below examples will show three versions:
- without lens detection (i.e. no internal and external corrections)
- with lens detection only (i.e. only M8 internal corrections)
- with lens detection and an additional Adobe RAW Lightroom profile
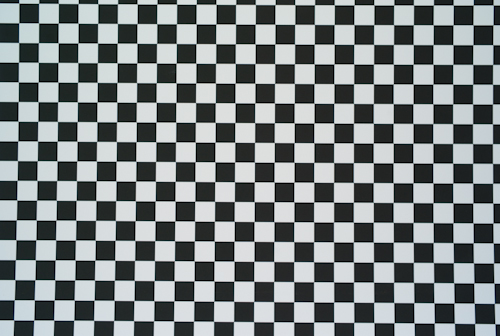
no lenscoding |
with lenscoding |
with lenscoding and
LR-profile
Summicron 35mm/f2.0 ASPH with and without lenscoding and additional LR profile, all shots
at f2.0
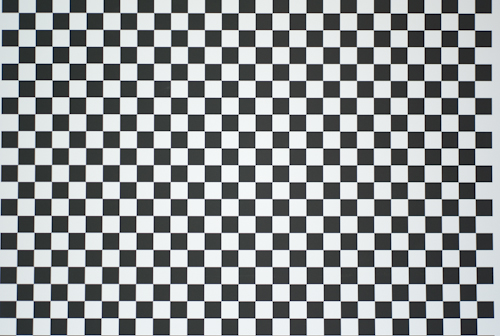
no lenscoding |
with lenscoding |
with lenscoding and
LR-profile
Summicron 50mm/f2.0 V with and without lenscoding and additional LR profile, all shots at
f2.0
no lenscoding |
with lenscoding |
with lenscoding and
LR-profile
Tele-Elmarit 90mm/f2.8 with and without lenscoding and additional LR profile, all shots
at f2.8
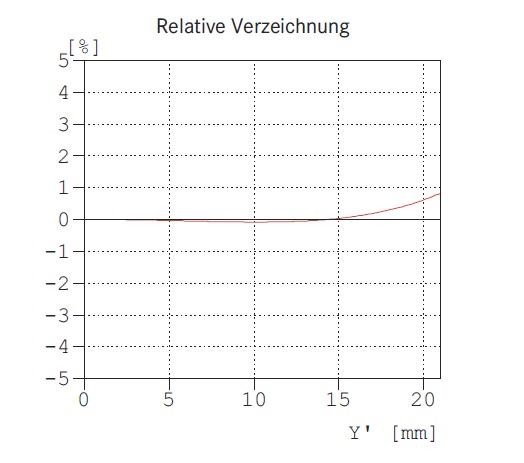
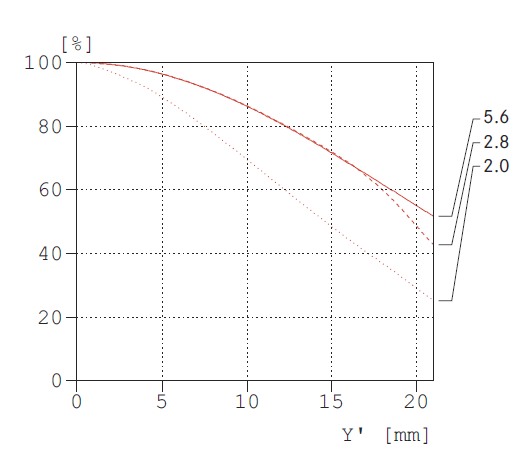
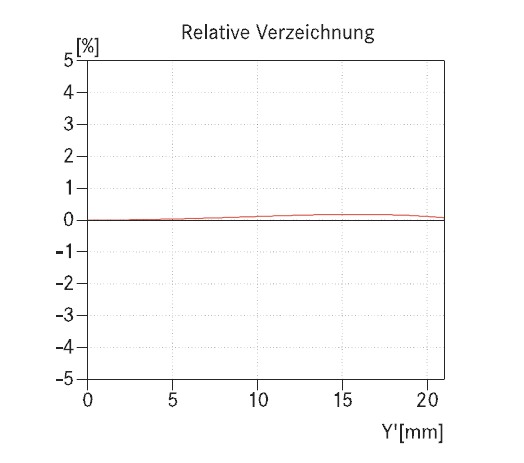
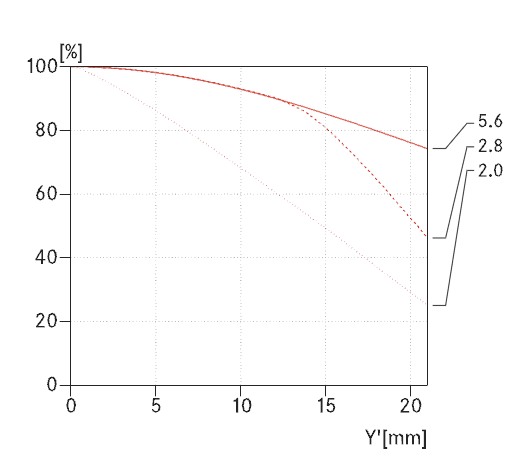
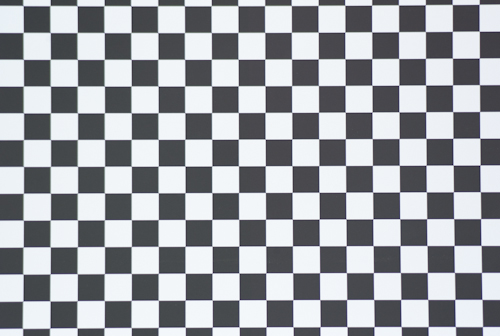
The following examples show the pattern used for the Adobe profile generation. These patterns show very nicely, if there is any distortion in the lenses. Prior to that, we should have a look at the distortion measured and calculated by the manufacturer himself. As the M8 is not a full format camera, all the ‘flaws’ of the lenses are relatively small, as these effects get worse at the edge of its coverage range which will be eliminate using a smaller sensor. The M8 sensor is an ASP-H sensor with a crop factor of 1.6; many SLRs use an even smaller ASP-C sensor with a crop factor of 1.6. The distortions are shown measured from the centre of the picture towards one of the corners. As the effects are symmetrical, only one curve is shown. The half diagonal of a full frame picture is 21.6mm, the one of a ASP-H sensor 16.6 and the one of a ASP-C sensor 13.5mm, i.e. you have to read the curves accordingly. I only found corves for the Summicron 35mm ASPH and the Summicron 50mm V, but none for the Tele-Elmarit 90mm. The curves from Leica show very nicely, that there is almost no distortion but quite a bit of vignetting for the two lenses: 50% means one stop of vignetting. As the examples below will show, the vignetting is nicely corrected by the internal and external profiles as mentioned above.
The question is now, if all these calculations on the picture information will have a negative effect on the sharpness or the picture resolution. I have found no example of such degradation and I think that most pictures look punchier in the corners due to the correction of the vignetting. But have a look on you own. The last example will show a 1:1 crop from a picture with and without profile corrections.


with lenscoding |
with lenscoding and
LR-profile
>Summicron 35mm/f2.0 ASPH with and without lenscoding and additional LR profilel, Detail
from the picture above, 1:1
Links
rangefinder cameras and the Leica M8
M8 galleries
London: Thames Path 1
London: Thames Path 2
Southengland
Barcelona
Hong Kong:
Tsim Sha Tsui
Hong Kong: Tsim Sha Tsui to Mong Kong