Field Experience with the Canon 5D MarkII
Introduction
After 5 years of very successful photography with the Canon 20D I changed in the summer 2009 to the Canon 5DMarkII (5D2). The 20D was a very mature camera but since some months I was already working with the second shutter, as the first one failed after almost 50'000 shots. The second shutter failed after about 30'000 exposures and at that time I already had problems with the shutter release. I therefore decided to go for a new Camera and the 5D2 was already on my list, mostly because it's full format sensor.
In this report I will not cover every detail of the camera and will not explain all the functions (which would fill a book on its own...). Detailed technical reports and reviews can be found on the net. I will also not discuss the stunning results you get with the 5D2. The pictures are simply put brilliant. You will find a lot of testing on the net and I'm not interested in “pixel peeping”; however, I'm still stunned by the quality of the pictured from the 5D2. And the 5D2s sensor will record all the details your lens will transmit, and all its flaws! This report will concentrate on the handling issues, i.e. what you will experience in the field. It will reveal some of the nicely designed software and hardware changes carried out on this model which makes it even nicer to work with than some of its predecessors.
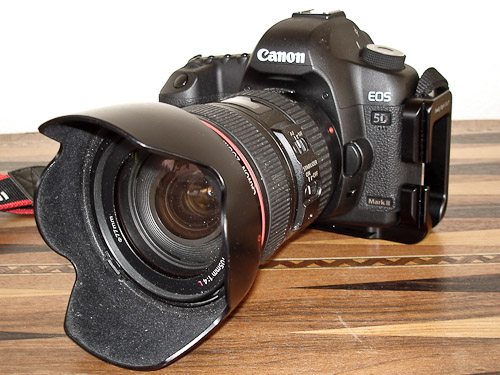
Body and Handling
Buttons and placement of functions
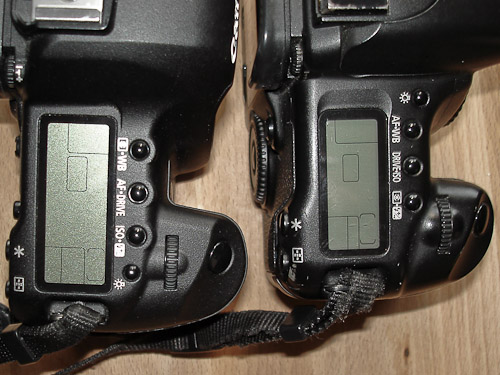
The handling of the 5D2 is very similar of what you are used from any XXD body. For me, coming from the 20D, there was not a big learning process involved and you will learn to work with the camera in a very short time (even though some of the extended functionalities require some extended learning). The same applies if you owned or own any other XXD body. The only thing that confused me for some time was the fact that some functions have been allocated to other buttons. For example the lamp button moved from the left to the far right on the camera top. This might not be a big issue but if you are used to the 20D and you are working with the 5D2 in the dark, you will be surprised why the light doesn't go on when pushing the left button. The same applies for the delete button, which was placed below the display on the 20D and is now exactly below the other buttons on the 5D2, probably because there is no more place at the bottom due to the bigger display. If you now want to replay a picture and you are used to press the lowest button on the left hand side the camera will ask you if you are sure to delete the picture: This will come as a surprise!
The functions on the other buttons have also moved quite a bit. The AF and White Balance Button has now become the Zone Measurement and White Balance Button, the Drive and ISO Button is now the AF and drive button and the Zone and Flash EV button is now the ISO and Flash EV button. I certainly don't care about which functions is assigned to which button, I just want to easily find these functions in the field. And if you come from a 20D you will have to re-think a little bit. I have no clue why the functions have been repositioned, however, I think the new assignment is a little bit more logic. The measurement system for the exposure is very much related to the colour balance measurement and the Auto Focus goes also good together with the Drive Function.
Display
I always have the feeling that the display of the 5D2 is almost too big. The display already demands a lot of space on the camera back and you have to get used to the design. But perhaps that's only because I was so much used to the small display of the 20D. I always had the same impression when I had a look at some of the direct predecessors of the 20D like the 40 or 50D. The display of the 20D already did its job: to control the exposure and the sharpness of the pictures taken. For me, the display is not there to have a look at all the nice pictures I have taken (i.e. act as a slide show display). Shots recorded as RAW will not look nice on the display at all anyway. I.e. I use the display for picture control. But there are two major advantages on the 5D2 compared with the 20D. The histogram is now shown in all three colours, which is a great help for exposure control especially for pictures of objects that have a deep colour cast. The other very efficient help is the much faster zoom capability. Compared to the 20D, the zooming used on the 5D2 is a formula 1 car compared to a tractor. And as it is always in life: If you can finish a job more effectively, much faster, you will also use it much more frequently. And the control of the sharpness of your pictures is much more critical on this high resolution sensor compared to the older lower resolution chips (see below). The display size helps when zooming. The higher resolution paired with the large display size will give you a 1:1 display sooner as when using a smaller lower res display. In addition, with the bigger display you will not get totally lost when zoomed deep into the picture details.
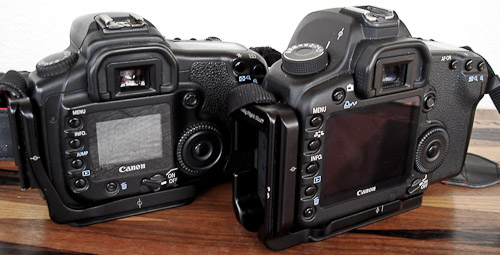
A sensor located on the back of the camera just below the display now controls the display brightness, which is a little bit hard to get used to (at least for me). If you are taking pictures from a room of the sunlit landscape, the sensor will darken the display in the room, as there is little light intensity. But your eyes are adapted to the sunlight outside and you will have troubles with the dark display of the camera. The function can be turned off, i.e. you have to find out for yourself what best fits your way of working. When taking pictures out of a plane this problem will be very obviously. The sensor is always dimmed at little sourrounding light intensitity, which is nice when working in the dark as the display brightness control will then make sure that your eyes will not get dazzled by the bright display and will therefore get desensiticed. This is specially nice if you take photos or relatively dark objects such like astro shots.
Finder
The finder is giant compared with any APS-C Sensor based camera on the market. It is simply put great to look through it and you will ask yourself why you didn't miss this kind of finder since analogue photography. However, I have realised a slight problem when using the Canon 400mm f5.6 L tele-lens, as a small upper band of the finder is darker than the rest. I have asked other photographers which use the same lens and even though they have not noticed it themselves they agreed on the fact after double checking. I have asked Canon about the issue and they have just checked my finder and mention that the finder itself is absolutely OK. It seems that this is a systematic problem and I wonder if you would also see it on other full format cameras. The effect is not visible on the pictures itself, i.e. it is a pure finder problem.
Finder information display
The information shown in the finder has also grown and it is almost too much. You will probably not be able to check with one view what is going on. However, the display of the ISO number in the finder is jut great and combined with the Auto-ISO function (see below) it will allow another way to take pictures. Seeing the ISO information in the finder will prevent you from taking the camera from your eye just to double check the ISO setting. Now, in most cases it is not required to consult the top display anymore when taking pictures.
Tripod Adapter plate
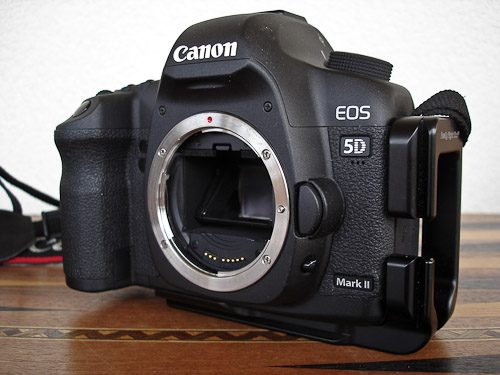
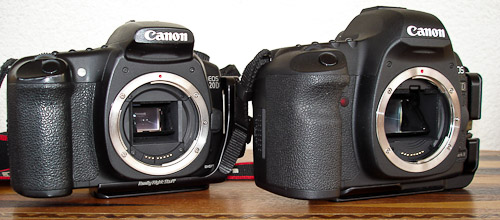
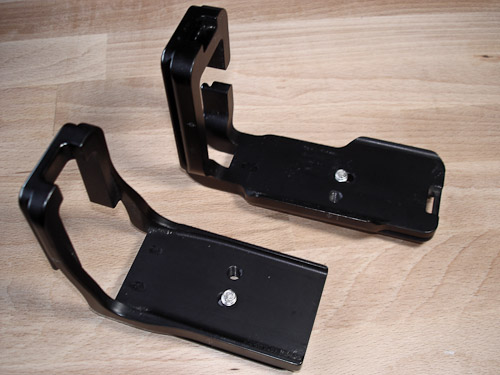
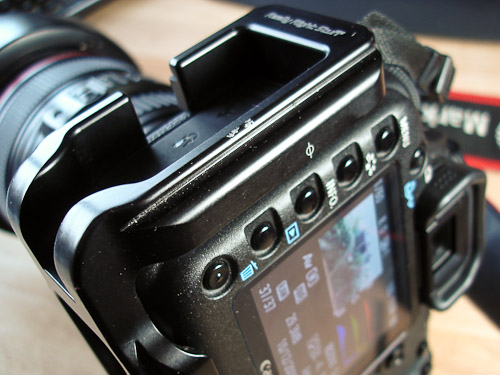
I already used a L- Adapter plate on my 20D and I think it's the perfect way to work with a tripod. The L plate allows you to either mount the camera horizontal (landscape) or vertical (portrait) on the tripod head. You therefore do not need to tilt the head sidewards when using portrait mode. The best adapter system for tripod mounts I know is the Arca Swiss system and ReallyRightStuff produces the finest plates for this system. The plate for the 5D2 is a little bit thicker on the left hand side, because the 5D2 has more plugs on the left camera side compared to the 20D (there is now a double row of connectors compared to the 20D which had just a single, more compact row). In addition to that, the remote control plug is now mounted such that the cable from the connector will be directed towards the front of the camera (because there is a double row of connectors) and the plate needs to be open against the front (see picture below). The plate therefore needs to be made more rugged and doesn't fit as nicely as it did on the 20D. More details on adapter plates you will find in my article about tripods.
Splash water and robustness
The body of the 5D2 is specially sealed against water ingress: Even though I never had any problems with the 20D, I think this is a great advantage. I have used the 5D2 for 4 weeks in the tropics during rain fall, in high humidity and also in splash water when taking photographs on the coast (i.e. salt splash water!). In high humidity I had more troubles with my eyeglasses getting misty than with the camera. However, after 4 weeks I realised a little bit of rust on the hinge of the battery compartment. I showed this to Canon and they just mentioned that this is normal, as the material used for the hinge is not stainless steel. What a surprise! I think its quite useless to build a camera with special water sealings and then use materials which will rust when in contact with water. The 5D2 is my first camera that is rusting and which is also officially allowed to do so! It is just a very small edge which shows rust, I must admit. And it is not influencing the functionality at all, at least not at the moment.
I have also tested
the robustness of the camera: It survived a 60cm (2 feet) drop onto a
concrete
floor. I was probably more shocked than the camera... This shows the robustness of the body of the
5D2. I
think that especially heavier cameras are more vulnerable than lighter ones and a fall like this
could
easily damage the camera severely. My earlier Hasselblad XPAN had to be sent for special repair to
Sweden
after it dropped from a similar hight from a cairn into the snow.
Usage in Cold weather
This January 2010 I had the first experience with the usage of the camera in cold weather. I will have some more details in the sections below on even colder experiences. The January days brought temperatures down to -7°C with snow falls. I tested the camera in this weather for approximately 2h and after 100 shots the battery showed still 3 of its 4 capacity steps, the same as before the shooting. The second day was clear and temperatures dropped down to -12°. I tested the camera again for 2h and did approx. 300 shots and had the same, very good battery performance experience as the day before. My battery was now used for over 8000 shots and the recharge performance is still excellent which is shown in the battery sub-menu with three green bars. It seems that all the steps Canon did to increase the battery performance in cold weather helped. This means, that the battery will keep almost as long as in moderate temperatures which is excellent and no special precautions have to taken. Before we made our trip to northern Europe, to Finnish Lapland, I still bought a back up battery because at latitudes above 66°north, temperatures can easily drop to -30° which is still a big step down from the -12° already experienced.
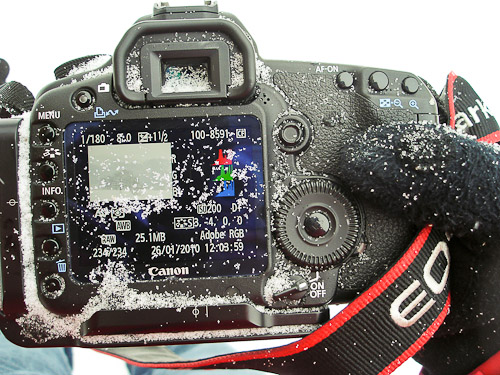
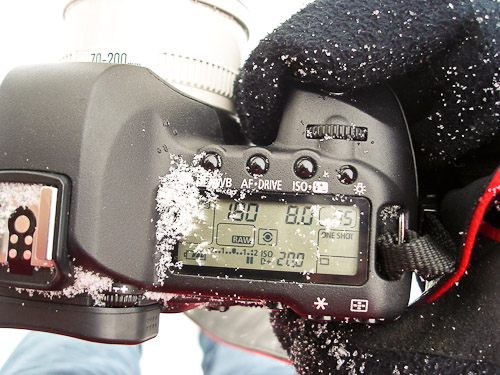
But before we dive into the arctic zones, let me report some other experiences which might be helpful planning a snow trip. When carrying your camera with the strap around your neck and a heavier lens is attached (well, all the EOS zoom lenses are heavy!), the camera back will always be horizontal and very well exposed to the weather. I.e. snow will find its way on the camera back. The picture below shows nicely how all the snow will start covering the back of the camera. With relatively cold temperatures (which is anything between 0° and -15°), the snow might easily melt below your hand when you grap the camera to take a shot. This could be a problem when releasing the camera. The water will now automatically end up in all the small immersions on the back. I experiences that water made its way to the back wheel and did freeze there. I could not use the wheel anymore as it was blocked by the frozen water which was quite cumbersome because I had just dialed in a +2 exposure compensation for certain shot and could not get rid of it anymore. I experienced, how imported the back wheel has gotten and how often you use it during shooting. Something you will only realize when the wheel is not available anymore. The only thing that helped was warming up the camera back and drying the camera. I wouldn’t say that this is something which is caused by a bad design of the camera back but you simply need to be careful with snow on the camera.
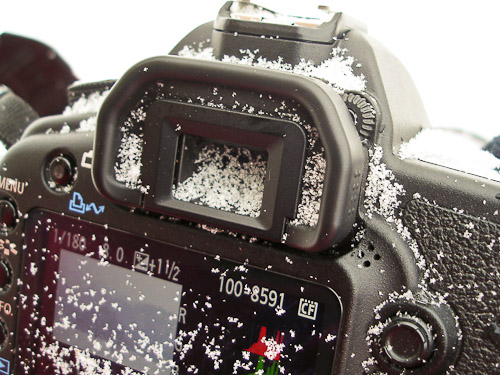
Another issue is snow that falls onto the camera finder. As the finder glass wis very much
counter-sunk, its
not easily reachable to clean. Snow is not that easy to get rid of as it will melt when touched and
the back
glass will look worse than before. It is therefore recommended to cover the camera back in snow
fall, which
will prevent both, the back wheel problem and the finder issue.
Generally, the camera is very well handled with cloves. All the bottoms and dials are well
positioned and
you will not have any problems controlling the camera even with ticker gloves. The lenses might be
protected
using a lens shade which will prevent snow falling on the front lens. The lens cap is the only issue
because
it cannot easily be detached when the lens shade is already attached. Even without gloves this is
not ideal
and with gloves its simply unusable. I therefore recommend to leave the lens shade attached to the
lens all
the time and just forget about the lens cap while shooting.
New Experiences 4/2010
In the meantime I did some more testing on the battery performance of the 5D2. On one trip to a
closeby
mountain where I experiences temperatures down to -10°, I started with a fully loaded battery
and after
448 exposures I returned with 57% battery capacity. If we linearly calculate the exposures per load
this wil
be equal to 1042 exposures. At a second trial I started with 66% loaded battery and ended up after
123shots
with 53%, which is equal to 946exposures per load, i.e. similar to the first trial.
A third trial included some long exposures using the bulb function of the camera. After 304shots,
the fully
loaded battery was down to 41% which is equal to 515shots per load. This shows how much energyis
required by
long exposures. If you plan for really long exposures, a external AC/DC adapter r an external
battery with
DC/DC converter will be required.
I also tested the camera now in northern Lappland with temperatures down to -25°. The
experiences are
very similar to those at -12° and the battery showed no problems at all. The performance is very
good
and I never had to use the back up battery at all. But if you now combine long exposure times whith
cold
weather, the battery will be a problem. I therefore recommend to use an external AC/DC
converter or
external battery as described in my article.
Functions
If you are used to all the functionality a 20D or similar offered, there is not much to wish for (at least that's what I felt like). OK, some of the menu items were hard to get to, like the mirror lock up and the AEB function, which both required a lot of bottom pushing to be executed. But you will get around it and frequent use will make these procedures a kind of automatic sequence. It was therefore surprising for me to see, how many efficient functions the 5D2 has to offer and how the engineers have optimised the operation of the camera; well done.
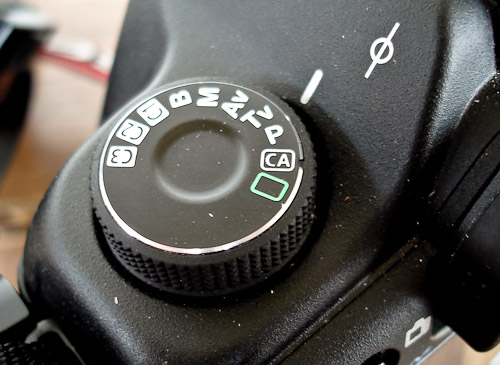
C1, C2 and C3
The three customer programmable settings on the function wheel are a great help to program the camera the way you like to operate it. These positions will remember all the camera settings you programmed and save them to one of the customer settings. I frequently use AEB (Automatic Exposure Bracketing) for HDR photography. I can now simply program AEB, step size and continuous drive to C1. This is much simpler to use than going through all the menu steps on the 20D; and then to reprogram the camera for normal operation. And as mentioned earlier: The functions which are easier to reach will also be used more often! I also programmed the mirror lock up together with the delayed shutter release to C2.
But there is one behaviour to consider which is a little bit confusing. All the settings will be programmed to the C setting, i.e. not only the mode (for example AV) but also the value (i.e. the explicit f stop). This is different for all the other program modes on the wheel. If you select AV and change the f-stop setting to f8, it will still be f8 when you return from another mode. This is not the case for the C settings. As they will remember the once programmed explicit setting, this setting will be there again when you retrurn to that mode and it will not remember the changes you did when working in that mode before. This behaviour puzzled me in the beginning. For me it would be more logical to just program the program mode to the setting, not the explicit preselection value.
MyMenu
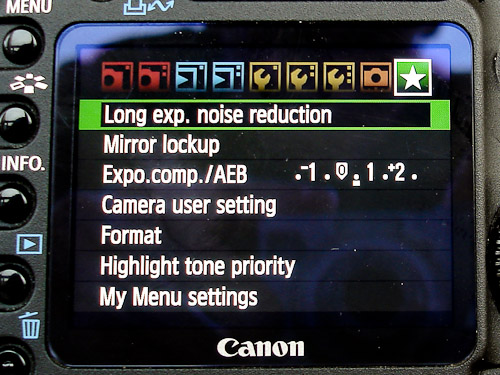
Similar to the customer functions on the program wheel is the MyMenu function, which allows you to collect certain often used menu tabs into one user programmable menu, the MyMenu. For me, these are functions like HighlightTonePriority, LongExposureNoiseReduction, MirrorLockUp and Format. I can even program the camera such, that the MyMenu will always pop up on top when I press the menu button. This is great. Now its very simple to format a new CF card.
Auto-ISO
As mentioned earlier in this article, the 5D2 offers an Auto-ISO function. This is not new to the EOS family as earlier EOS models also offered this functionality (the 20D didn't). However, it is new to me and I think there is a great potential in this function. The Auto-ISO comes into action when combining it with the AV mode, i.e. exposure time automatic with aperture pre-selection. The camera will use the optimal exposure time for not ruining the picture by lens vibrations. The program follows the 1/focal length rule, i.e. the time should always be shorter then 1 divided by the focal length used. Using a 400mm tele-lens for example, the camera will always try to use times shorter than 1/400, which will be a 1/500 second or shorter.
As its getting darker, the camera will open the aperture to allow using a shorter exposure time. As soon as the aperture is fully open, the camera will increase the sensor sensitivity, still opting for the correct exposure time. Only as the max. ISO is reached (which is ISO 3200 when HighlightTonePriority is activated) the camera will also allow longer exposure times. You can even use manual time and exposure settings (i.e. the M mode) and let the camera choose the correct ISO for the right exposure. This is also the only method when photographing fast moving objects which require shorter exposure times than the 1/focal distance rule will give (beside using Tv, see below). A way around this would be, if the camera would offer to make the threshold time selectable for the user, for example: 1/focal length -1. But this would probably make the programming of the camera also a little bit too complicate. A way around is using TV mode, where you just select the desired time for sharp pictures. However, you have to change this time when changing focal length, probably a little bit too cumbersome when using a zoom length.
Getting sharp pictures and vignette
Getting sharp pictures was never easy and the high resolution sensor of the 5D2 makes this task even more difficult. Even the smallest shake of the camera will blur your image and you will be surprised how often it is difficult to reach the optimal sharpness. Especially in macro work it is often difficult to opt for the best sharpness. You could choose to not go for the highest resolution using sRAW 1or 2 which would relieve the demands on shake free photography. But I never use this option. The fast zoom in function of the 5D2 will help you in checking your success rate.
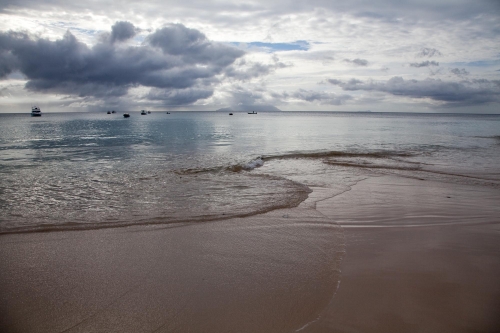
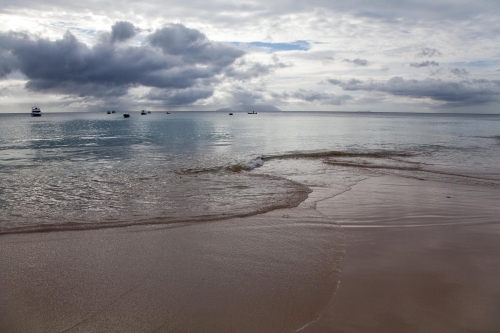
Another issue is the vignette. The high resolution sensor will record all your lens can give and you will see many more flaws which have never been an issue on the APS-C sensor camera. One very easily recognisable effect is the vignette. It is even visible if you use the lens not with the widest aperture available. Below you will find an example of a picture shot with the 24-105mm f4 IS L lens used at 24mm at f8, i.e. 2 stops down from the widest aperture (which is by a rule of thumb the aperture where the lens will give the best quality pictures). The good thing is that with today's software this effect is easily fixed.
Canon 5D MK2 8/2010
New experiences in humid areas, ERR20 encounter
After the camera was tested quite extensively in cold weather conditions, I would also like to repot
on some
experiences in warm and hot/humid weather conditions. I already did extensively use the camera on
the
Seychelles for 4weeks and used it in all kinds of conditions, like sandy beaches with a lot of
saltwater
splashes and in the rainforest during rain drizzles. The camera seems to be very robust in these
conditions.
But lately I had the opportunity to test the camera again in the monsoon area in HongKong, which is
22°
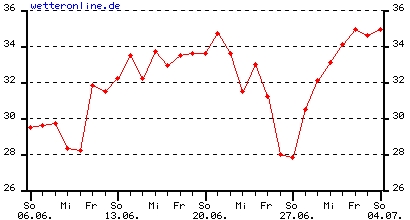
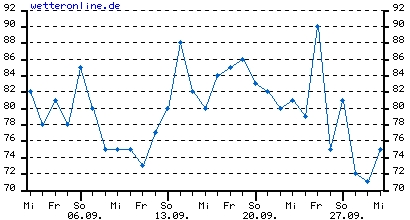
north, well within the tropics. To show you the differences in climate between the Sychelles and the
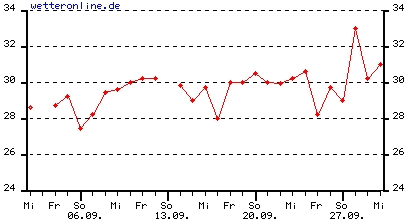
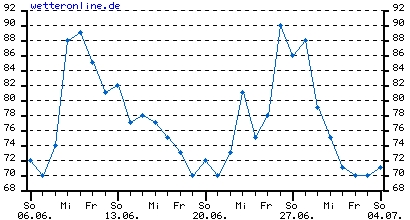
HongKong area I added some temperature and humidity measurements from the web page www.wetteronline.de for that specific time period. As you
can
see, the weather conditions are quite similar, even though the temperatures and humidity values
might rise
to higher values in HongKong. In addition to that, the differences from day to day are
much
higher in Hong Kong. I’m trying to find differences because an Error occurred on the camera
within the
first day of shooting that never happened on the Seychelles.
There is something else which is different climate wise in Hong Kong and the Seychelles and that’s the use of air condition. While we lived in the Seychelles for 4 weeks with no air-condition at all, all the hotels, restaurants, shopping centers, metro etc. is cooled to the max in Hong Kong. It is sometimes even uncomfortable cold and the use of the air-condition is certainly too much. When leaving the hotel, my glasses get sometimes misty and the same applies to the lenses of the 5D2. As all the Canon lenses are relatively heavy, they are very susceptible to condensation. In parallel I used my Leica M8 with the Summicron 35/2 lens and never experienced any fogging with this camera, probably the lens is much lighter and adapts much easier to the new temperature. And as the error described below happened when coming back from a shooting into the hotel, this temperature drop might also be a certain stress for the camera.
Err20, shooting not possible
After returning from a shooting in HongKong the camera suddenly started to lift and drop the mirror totally uncontrollable while I was changing lenses. The whole thing stopped after a while an Err20, shooting not possible showed up on the back panel display. I tried to switch the camera on and off, exchanged the battery, used another lens, all in different order but nothing helped. The camera started flipping the mirror as soon as you switched it on again.
I went to the Canon repair center the other day and the lady started with exactly the same procedure as I did, i.e. changing the battery, … After a while, she decided the camera needs to be repaired and withdraw the battery and the CF card. But as I found out that it will take them 5 working days to repair I decided to have this done back at home. When I put back the battery and the CF card afterwards and just switched the camera on again, it suddenly worked as before. I have shot in the meanwhile about 100exposures and everything is like before. I wonder now, if the CF could have had an influence on the behaviour, because that’s the only thing that we didn’t change while trying to bring back the camera to normal operation. I’m reporting this here in this detail because ERR20 seems to be a quite seldom Error on the 5DMK2 and even though I have found some reports on the internet thee was no conclusion on what exacltly happens to the camera.
After returning home I did sent in the camera to the local Canon repair center and they exchanged the whole shutter and mirror assembly. Now, the camera shutter sound totally different but works; let's hope.