Rangefinder Cameras and the Leica M
Introduction
The rangefinder camera bears a totally different technical concept than a single lens reflex (SLR) camera. With a rangefinder camera you will use a finder which is independent from the lens, i.e. it has some similarities to the widespread compact cameras on the market. But the rangefinder camera with an optical finder is much more than a simple compact camera. With a rangefinder camera you cannot use the display as a finder (at least not today). This is the same as with a digital SLR (DSLR) before the life view was invented. But the optical finder of the rangefinder is one of the unique features. It is very bright and shows much more than just the area covered by the lens.
This article is based on my experience with three rangefinder camera systems I used in the last 20 years. In the analogue age this was the Contax G2 with 21, 28, 35, 45 and 90mm lenses and a Hasselblad XPAN panorama camera with 45 and 90mm lens. The latter was very similar to a Leica camera system but did feature extended film site up to 59mm on a 35mm standard film.
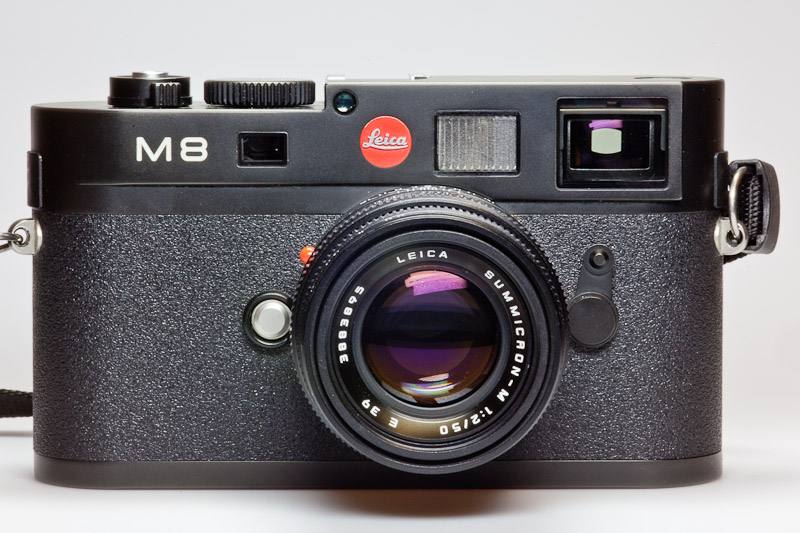
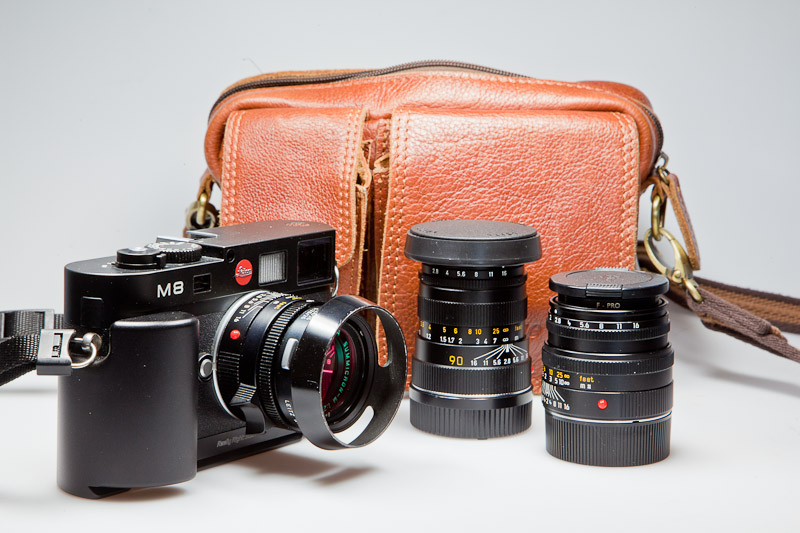
In the digital age I use a Leica M8 with 35mm, 50mm and 90mm lenses. Because I’m currently using a digital Leica rangefinder camera, I will also focus a little bit on this model in his article but most of the things discussed are also valid for other rangefinder systems. Leica is actually the only brand which offers digital rangefinder camera with an exchangeable lens system today (spring 2011). At the moment, the Fuji X100 is released, but this camera has a fixed lens which equals the widely used 35mm lens. Another system which is somehow comparable to a rangefinder system is the Olympus Pen and the Panasonic system based on the micro 4/3rd standard. But these systems use a video finder which is way inferior to a real optical finder, nothing you will bother about f you have once used an optical based finder.
Functionality
The most widespread camera in the photography world is the SLR or today the DSLR (ok, the compact camera is probably wider spread but let’s focus on cameras for the prosumer user). The nice feature of SLRs: you are looking through the lens to compose your picture. You will automatically have the right angle of view and the right perspective without any parallaxes and you can use any lens that fits the bayonet. There is a wide variety of lenses from the widest wide-angle lens with 14mm to the mega tele with 1000mm and even special lenses such as fish-eye, macro or tilt shift lenses can be attached and you will always see all the optical specialities through the finder, for example the tilt and shift effects. But looking though the lens will require a removable mirror between the lens and the sensor and this mirror requires some space. This space requirement is typically in the range of 50mm. But this means, that lenses with focal lengths shorter than this need to be design in a special manner so that their focal point lies outside the lens itself. This requires a complicate construction and that’s one of the reasons why SLR wide angle lenses get that bulky and have still inferior performance compared to the very compact, small wide angle lenses used for rangefinder cameras. Another issue is the fact that the finder does not show anything that lies outside the coverage of the lens itself. I will have more on that later in this article.
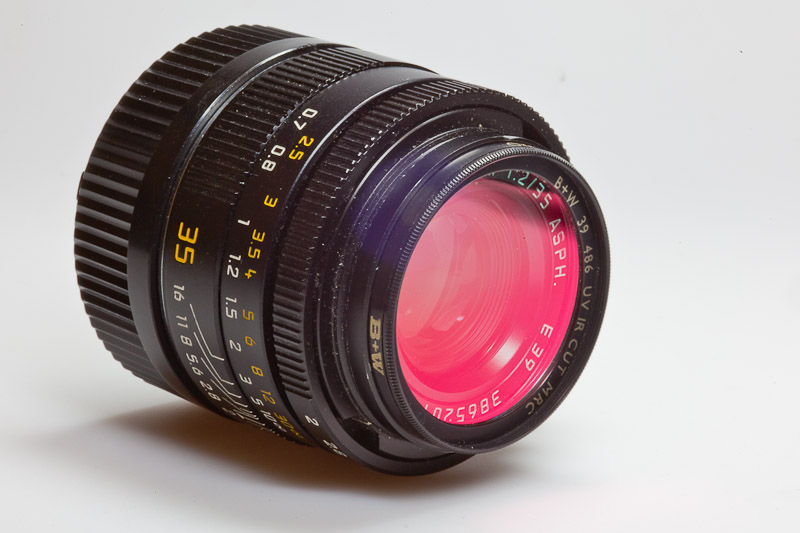
The rangefinder camera on the other hand requires no space at all between the lens and the shutter. This is very nicely seen at some wide angle lens constructions, where the lens itself penetrates into the housing well behind the cameras bayonet. This gives the optical designer all the freedom in lens design, probably one of the reasons why wide angle lenses for rangefinder cameras are that good. But in the digital age this has its disadvantages. I still remember all the discussion before Leica entered the market with its M8, if a digital rangefinder could be realized at all. The light coming from a wide-angle lens very close to the sensor will hit the latter in a very shallow angle, i.e. the chance that the light will be simply reflected is very high. Digital sensors seem to be much more effected by this than analogue film. That was one of the reasons, why people doubted, that a digital rangefinder camera can be constructed. But with the introduction of microlenses all this changes. The M8 now uses a special arrangement of micro lenses on its sensor, with microlenses being shifted towards the sensor the further they are away from the sensor’s centre. Even though the problem with the sensor was solved, there remained an issue about the infrared (IR) sensibility of the M8. All digital sensors (CCDs and CMOS sensors) have a sensitivity that extends into the near infrared. As the camera should only be sensitive to the visible light between 350 and 750nm (actually all electromagnetic wavelength that is visible is called light, we should therefore use the term electromagnetic waves when talking about IR wavelength, but this is a detail), a IR filter needs to be mounted in front of the sensor. It seems that efficient and thin IR block filters were not available when the M8 was designed and such, this camera has an increased IR sensitivity which leads to black textiles being rendered as dark red, i.e. an additional IR block filter needs to be used in front of the lens. However, this gives the photographer the possibility to use the M8 for infrared photography, which will be covered in a dedicated article.
The finder
The great thing about a rangefinder camera is the brilliant and very light finder. The finder view is actually
independent from the lens used, i.e. you will always see the same view with different markings for different
wavelengths. At least this is the case with a Leica M camera. A Contax G for example automatically adapts its
finder to the lens used. But this could also be a disadvantage. The nice thing about a finder which covers more
than the lens itself is that it will give you the possibility of observing the area outside the field of view of
the lens without moving the camera, i.e. you are able to see what’s entering the frame. You are able to
always check whether there is something else you like to have in the frame or how much room you have to move
something out of the frame by shifting the lens to the side or up and down. I.e. you will have a much better
overview of the whole situation compared to the case where your view is limited to what the lens is seeing.
As mentioned above, the finder will show you some markings for the area covered by a specific lens. A Leica M
system will show you two frames at the time, i.e. when you change the lens, the frames will be changed. The M8
shows you three different frame sets, one for the 24 and 35mm lens, one for the 50 and 75mm lens and another for
the 28 and 90mm lens. The M9 will not show you the 24mm frame lines but the 135mm frames, because the M9 uses a
full frame sensor compared to the 1.3 crop factor ASP-H sensor of the M8. The table shows you the relative focal
lengths for the full frame and he ASP-H sensor (the focal length actually stays the same on a ASP-H sensor but
the angle of view will equal a lens with the listed focal length on a full frame sensor).

As you can see, the finder is available only for a limited range of lenses between 28 and 135mm on a full frame sensor. Shorter lenses will require an external finder and longer lenses are not available as they cannot be focused accurately anymore.

All this means that each frame for a specific lens will show you more or less of the surrounding. The 24mm frame lines on the M8 doesn’t leave much room outside the lens’s coverage area while there is a lot of room outside the 90mm frame line. It also shows us, that there is no option for a zoom lens, as only dedicated frames can be shown in the finder. The Contax G cameras on the other hand didn’t have this limitation, as the finder was continuously adapting the zooms focal length. However, this is the reason, why no zoom lenses are available for the Leica M system. But there are tri-lenses available, which cover three different focal lengths. They may be selected using a ring on the lens very similar to a zoom lens, but there are only three dedicated positions. These lenses have exceptional quality and are almost as good as the primes but with less good apertures, they are limited to f4.0.
Focusing
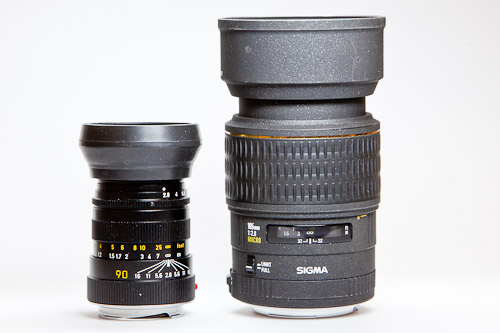
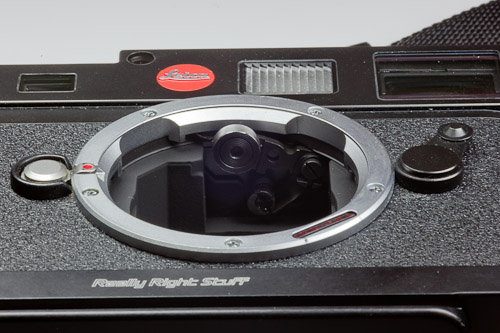
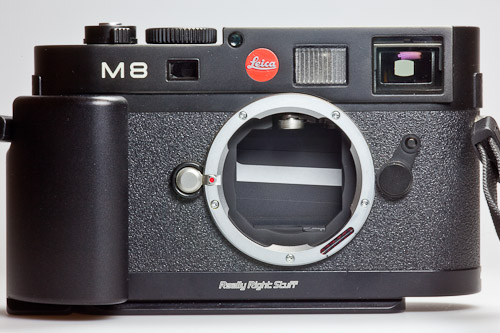
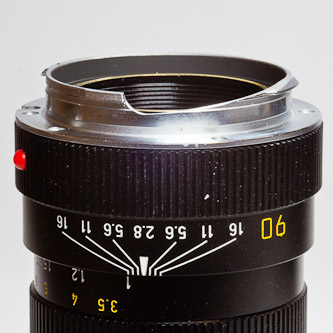
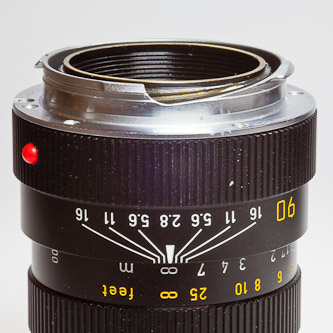
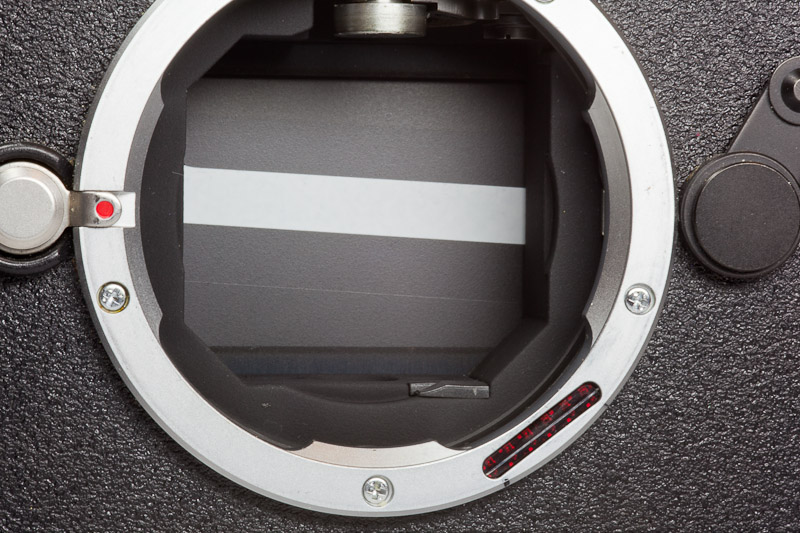
The focusing with a rangefinder camera is very different compared to a SLR. The rangefinder uses a focusing system which is independent from the lens used, i.e. the focusing accuracy is independent from the lens’s opening angle. To focus, a second picture will be superimposed on the main picture in a translucent way and you simply need to bring the two pictures into coverage to get the correct focus. This is realized using a second window on the rangefinder cameras front, which can be seen in the pictures. The small window between the red dot and the M8 logo is the one used for focusing; the big window on the far right hand side is the finder window. The middle milky window is the one used to superimpose the frame lines for the different lenses. When using the focusing ring on the lens, the lens barrel will be coupled to the focusing mechanism of the camera with a wheel and a lever inside the cameras bayonet as shown in the picture. I.e. the lens focus ring acts purely as a mechanical actuator for the focusing mechanism. When turning the focus ring, the brass inner tube of the lens will be rotated out of the outer barrel as shown in the pictures for a 90mm Tele-Elmarit. And this brass barrel will then activate the small wheel on the lever which is coupled to the focusing mechanism of the camera.
Focusing is a one time process. There is no need to re-focus picture by picture when the situation has not changed. Well, this is the same when manually focusing a SLR, but with today’s auto focus SLRs the situation has changed. You now need to save the once found focusing position, i.e. you need to prevent the camera from refocusing, which I think is not a logical process. This leads me to the typical example street photography: You are selecting a frame, a nice stage where something may happen. You are now waiting for the actor to enter the stage and then quickly take the shot. No focusing, no exposure measurement, everything is preset. And you can wait for a hundred different actors and the once made settings are valid all the time.
Metering
The metering process itself is not much different from a SLR. The light reflected from one of the shutter blades will be measured. The one shutter blade used is printed in white as shown in the picture. This is a simple centre weighted integral measurement; no multi filed super duper measurement. And I think this is not required either. You are measuring the scene using preselected aperture which you dialled in directly at the lens. There is no such thing as a program mode, i.e. you should have an idea what aperture to use in which situation. You see: the rangefinder camera makes you think. The camera will now tell you the exposure time using the LED display inside the finder. The aperture will not be sown, you already selected it at the lens and you should know what you just selected, right? You’ll now take a picture and consult the histogram. If the exposure needs to be corrected I normally directly use a manual exposure time setting which I think is much easier than dialling in a +/- correction on the camera. When you manually dial in an exposure time, there will be no more information in the cameras viewfinder (you know the exposure time you just dialled in) and all your concentration is now on the picture itself: Great! You can now use this aperture and exposure time combination until the scene is changing. You’ll find out what needs to be changed by consulting the histogram.
Lenses
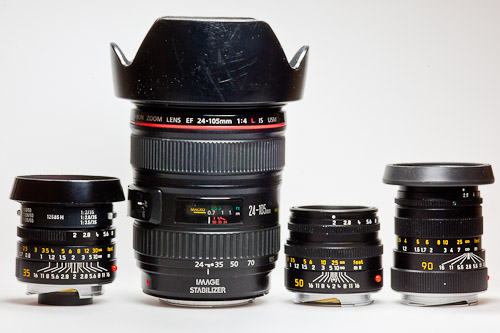
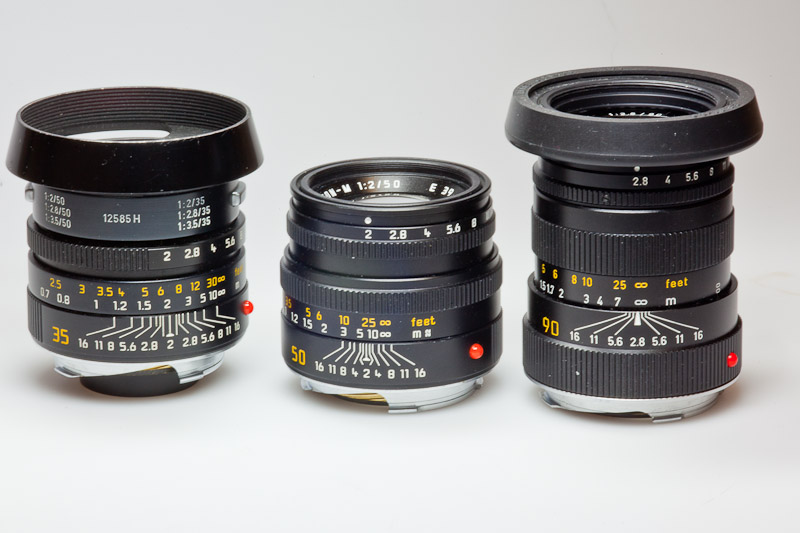
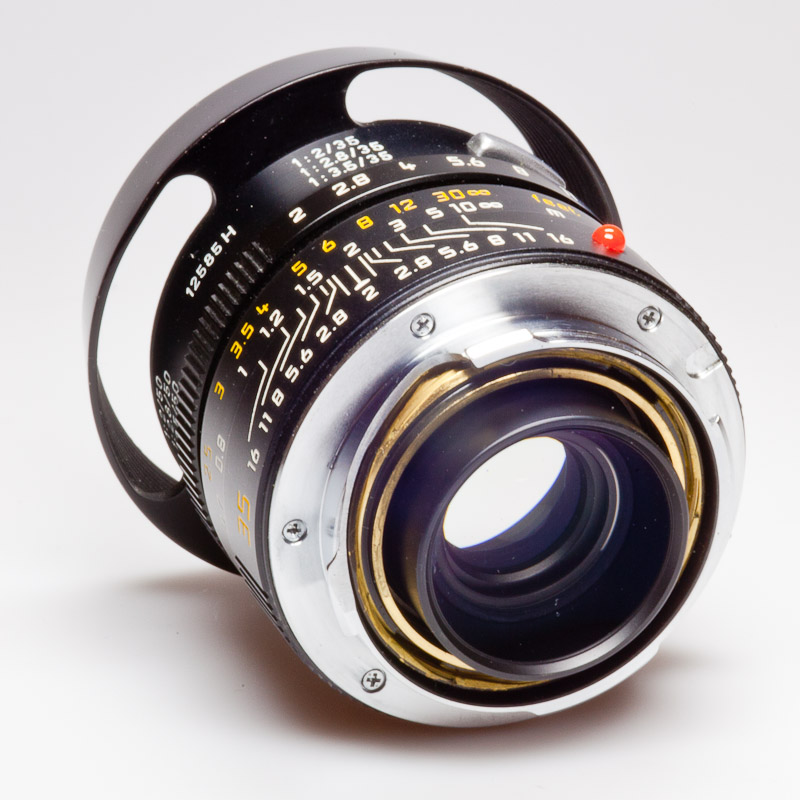
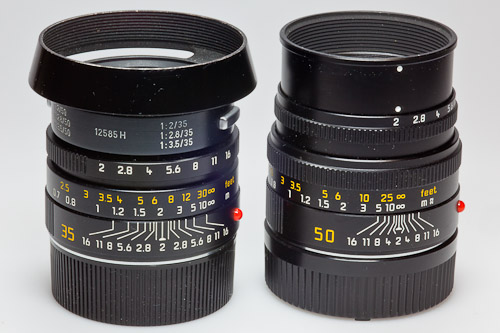
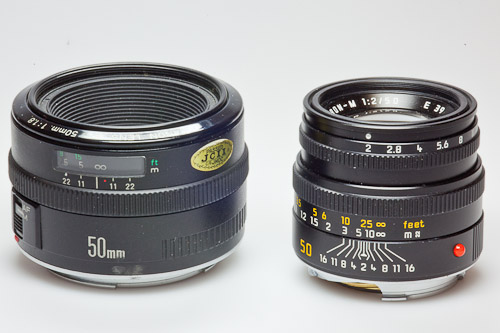
Lenses for rangefinder camera systems are generally spoken much smaller compared to their SLR counterparts. Especially wide angle lenses feature very good form factors with amazing aperture values. Compared to those wide angle rangefinder lenses with superb quality, the SLR versions look like elephants with still inferior performance. At the moment I own three lenses, the Summicron 35mm ASPH, the Summicron 50mm V and the Tele Elmarit 90mm. All these lenses weight around 250g and are much smaller compared to SLR lenses. I have added some pictures which will show you the differences between the lenses. The amazing thing is that even the 90mm lens is much smaller than the same lens for a full format SLR, i.e. even lenses that do not benefit from the non existent mirror problem as mentioned above can be designed much smaller. I guess that one reason for that is that rangefinder lenses do nor feature any electronics and no motors for AF or electrically powered apertures. All these features require space (and power). Another big difference between rangefinder cameras and SLRs is the wide usage of zoom lenses. While those lenses are widely used in the SLR market they have no real importance for rangefinder cameras. As mentioned above, one reason is that Leica M cameras only feature fixed frames for certain focal lengths and therefore a zoom lens is only of limited use. The fixed focal lengths are actually the prime lenses for a rangefinder system. And most of them feature excellent large aperture values. While zoom lenses with let’s say an aperture of 2.8 for an SLR already gets quite big, a rangefinder lens with 2.0 can still be very compact and has already one stop higher opening. And in the wide-angle lens market, there are many lenses available for rangefinder cameras which feature excellent openings up to 1.4 even with focal lengths of 35 or 21 mm, something which is very rarely found for SLRs.
The nice thing about fixed focal lengths is that you are learning all the optical details about a certain focal length and its opening angle. If you start with just one lens, you will get used to it and will soon learn how to attempt the opening angle of this lens. You are starting to preview the scene and you will soon be able to guess if a certain object fits in the frame or not or if you have to move a little bit to take the picture. And this is a very important factor: You will learn to move around and capture the object with a certain focal length which will feature a certain characteristic. The behaviour is totally different when using a zoom lens, where you will be tempted to zoom in until the object fills the frame. But then you will probably take the picture with 50mm and not the 35mm wide angle effect once planned, i.e. the picture captured will have a different optical symmetry.
But even with fixed focal lengths you will have more freedom in the digital age. I often capture panorama photos which will consist of multiple pictures which will be stitch together in the computer later on. The Leica makes this approach especially easy. As you are getting used to work with manual settings and as you have to focus manually anyway, realizing a multi shot panorama where all the pictures need to have the same exposure time and aperture, this is very easy. And if you are working in the RAW format, something you should do anyway because of quality issues, the white balance can still be set afterwards.
And finally: it is very nice to work with Leica lenses. Their mechanical and optical design is just that perfect, that it’s a fun working with them. No plastic, just compact real metal with great mechanical touch and everything is just going smooth. Non Leica users are often confused by the funny names used for Leica lenses. Leica users are not just talking about 35 or 50mm lenses but use terms like Summicron or Summilux. These terms actually just identify the lenses maximum aperture. These are the most common names:
- Noctilux: Aperture 1.0
- Summilux: Aperture 1.4
- Summicron: Aperture 2.0
- Summarit: Aperture 2.5
- Elmarit: Aperture 2.8
- Elmar: aperture 3.8-4.0 (exception Elmar 1 :2.8/50mm)
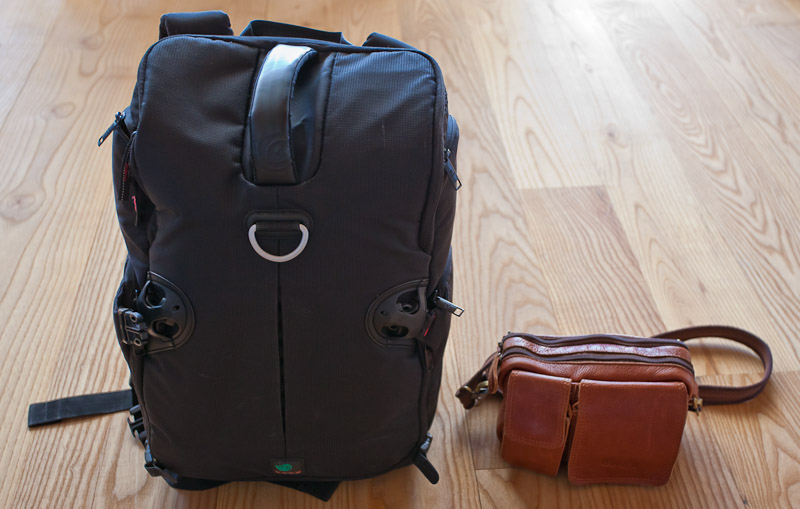
The standard lenses are the Summicrons. They offer a very good opening of 2.0 and are still very lightweight. They are that light that you do not really have to think about taking them with you on a trip or not. Have a look at the picture of my equipment above, the small bag holds three lenses and the M8; if you have the camera I use there are only two lenses ate amere 500g left n the bag.
The Summarit lenses are the lower cost version, but in Leica terms lower cost has a different meaning; everything is relative. The Summarit lenses came to the market when the M8 was released to give digital photographers and entrance into the Leica system. The Summilux versions have a one stop better aperture than the Summicrons, but as the list shows, you already have to accept a quite bigger weight and size for that extra stop. The difference between the Summarit and the Summicrons is much smaller. In the table, the Summicron size and weight is set to 100%, while a Summilux 50mm already weights 40% more than the Summicron and is 23% bigger. The Noctilux, which is a very special lens without questions, is already three times the weight and also three times the size (and you will probably have to pay more than three times for it). The Summarit on the other lens is only 4% lighter; i.e. the decision to use a Summarit is probably price driven.

The Elmar is mainly known for the tri-lenses, which is as explained above the Leica-zoom solution. The lens olds three different focal length, at the moment there are two versions available. The first one is a Tri-Elmar wide angle, which covers the focal lengths 16, 18 and 21mm. This lens requires an external finder and there is a special one available which covers all the three opening angles. This second Tri-Elmat is the one featuring the most often used focal lengths of 28, 35 and 50mm. Both Tri-Elmar have (like most of the Leica lenses) exceptional build and optical quality. The optical quality of the second Tri-Elmat are very comparable to the standard lenses, which comes to surprise for most photographers as one would expect degraded optical quality with a lens that offers multiple focal lengths. But all this comes at price of a reduced aperture value of 4.0, which is, compared to a Summicron lenses 2 full stops in difference.
The high quality standard set by the Leica lenses means that you can use the lenses already wide open and some of them show their best quality when used at its extreme aperture value. Some of the designs involve the use of lenses with aspherical surfaces (ASPH) which are used to correct the spherical aberration in the lens design. Leica is known for being able to produce these special lenses even at bigger sizes. But not all designs involve those special ASPH designs, the newest 50mm Summicron V that I use for example uses no aspherical lenses at all and its optical characteristics are exceptional. Some older design will still benefit closing the aperture a little bit. My Tele-Elmarit for example, which is based on a design from the year 1982, almost 30 years old, benefits from a one stop closing of the aperture ring and even going down to 5.6 helps a little bit.
Some optical ‘flaws’ of the lenses can be corrected later on using software either inside the camera or externally in the RAW converter. While the internal processing uses profiles created by Leica, the external processing in the RAW processor either uses profiles which can be downloaded either from the RAW software manufacturer or you can create your own profile for a certain lens and camera combination. I have written an extensive article on the problem around the software correction either internally in the camera or externally in the RAW converter; the article is called Leica lens coding. All this software bases correction require the lens to be coded that the camera will be able to record the lens settings into the EXIF file which then can later be used either internally to select the correct profile or externally by the RAW converter software. But all this is described in my dedicated article and I will not dive any deeper here.
Tripod adapter
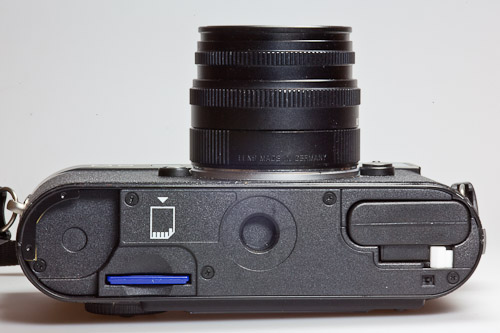
You might wonder why a tripod adapter will be covered here. The reason lies in a special design of the Leica M cameras. They all feature a camera plate which I used to access the SD card and the battery. Well, when the camera was first designed there was no such thing as batteries or SD cards. The plate was simply removed to change the film. Thus, the back of the camera didn’t have to be opened which was probably a design decision toward a more robust and solid construction. When the M8 came to the marker there was a lot of discussion why this removable bottom late was still there and why it was not omitted and replaced by SD and battery compartments found in other digital cameras. But I think it was a very nice design decision to keep it that way, because the SD card and the battery are now very safely hidden and protected from the outdoors. And with today’s capacity of SD cards and the battery lifetime it’s not really an issue anymore. On a typical days shot out with 1000 exposures I only need to exchange the battery once a day, the SD needs not to be changed at all (a 8GB card hols approx. 1400 RAW files). I therefore don’t car if the body plate needs to be removed for that or not; not a big issue.
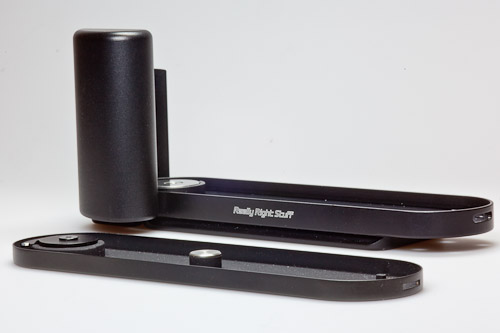
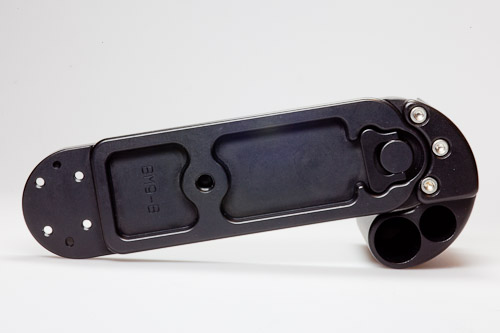
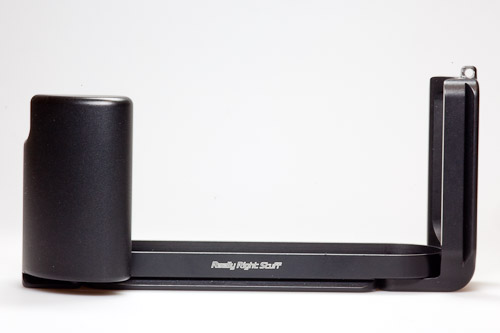
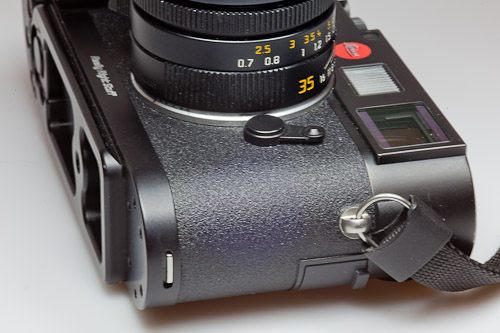
The exchangeable body plate now gives external companies to design plates which feature a tripod adapter. The plate I use is the one from Really Right Stuff (RRS) which has an included Arca Swiss adapter plate. The Arca Swiss adapter luckily enough has about the same width as the M8 itself and therefore can nicely be integrated with the body plate. And the RRS body plate is more than just a simple body plate with tripod adapter. It also features mechanical connections for a grip and a L bracket. The grip will make the handling of the M8 a little bit easier and you can hold the camera more securely in your hand. And the L bracket will allow the camera to be mounted on the tripod in vertical position (i.e. for portrait format) directly without tilting the tripod head to the size. With the L bracket, the camera remains nicely cantered on the tripod and does not hang on one side of the centre axis. This is very handy when changing between landscape and portrait format or when shooting multi shot panoramas. Once you get used the L bracket you will really miss if it you don’t have it. I normally don’t mount the L bracket on the M8 all the time, because I use this camera mainly handheld. Therefore add the L bracket only if I need to work with the tripod.
But there are some design flaw s in the RRRS plat which I’m not quite used, to, because normally, the RRS products are very well designed and nicely thought through. First of all, you need to take off the camera strap on the side the L bracket will be attached. And as the holes in the L bracket are less wide than those on the camera, this is not carries out that fluidly as it should be. Secondly, there are holes in the grip, which are probably designed to decrease the weight of the grip itself. That’s OK, but why not closing these wholes afterwards? The third bad design is the holes used for the screws to be used to mount the grip and the L bracket. If you have not mounted these options, the holes have to be closed using silly rubber pieces. That’s something that just doesn’t work again and again, you will losses these rubber things and they ate cumbersome to be removed anyhow. I just leave them away, but no I have holes in the camera body…. But still, the plate and the grip are nicely designed and I thin it’s still beneficial to use them.

M8 Galleries
London: Thames Path 1
London: Thames Path 2
Südengland
Barcelona
Hong Kong:
Tsim Sha Tsui
Hong Kong: Tsim Sha Tsui to Mong Kong