No Startrails
Introduction
Exposures of the night sky are very impressive. Due to the fact that a digital sensor (and also film) is capable to record low light levels in an adaptive manner makes details visible which cannot be seen by the human eye. The human eye has a certain maximum sensitivity which cannot be increased by ‘exposing’ it longer to an object. The problem with long exposures is that the earth is not fixed in space but rather rotates. Long exposures will make look stars like lines on the sky (startrails). If you like to record the sky more likely how you see it you’ll need to find out what the maximum exposure time is to record stars sharply. An alternative solution would be to follow the sky’s movement with a movable mounting: These mountings are not that cheap and also not that easy to operate. In addition to that, any object on earth be captured on the same picture will be recorded unsharply because the camera is now moving relatively to the earth.
Calculations
The maximum exposure time for recording the stars sharp on the picture depends on various factors:
- focal length of the lens used
- size of the chip or film used (which is important to calculate the opening angle)
- the maximum unsharp radius (the circle of confusion = coc) allowed for a sharp final picture


The earth rotates around its axis once a day, i.e. 360° within 24hours, 15° each hour, 0.25° each minute or 0.004° each second and so on. This movement can now be calculated as a relative movement on the chip surface dependent on the three factors listed above. The movement on the chip is the projection from the real movement on the sky.
Each lens has a certain opening angle dependent on the focal length and the sensor or film used. You can calculate this opening angle for the diagonal of the chip or film. The diameter is now a fraction of the diagonal and this fraction can be calculated back to an angle. The calculation needs to be carried out for each lens and each focal length used and for each sensor or film (for example if you use the same lens on a reduced size sensor such as a APS-C sensor and on a full frame or film camera). The diameter of the maximum allowed unsharp circle will be different for each sensor type and film (more on this in the text below).


For the calculation the diameter of the unsharp circle is assumed to be equal to the distance between two pixels. To make things simple it was further assumed that there is no gap between pixels. For film, a standard value of 0.03mm for the diameter of the unsharp circle was used. The table below shows the results for an APS-C sensor with 8MegaPixels (15mm x 22.5mm, 2336 x 3504 Pixels, 8.2MegaPixel, Crop factor 1.6) and for film. If this approach makes sense or if another calculation for the coc, the circle of confusion shall be used, will be discussed later in this text.


In practice
Tests show that maximum exposure times of up to 20seconds using a fish eye lens with 15mm on a APS-C sensor will still result in sharp pictures. The table gives a forecast of 8.3 seconds, less than half the value found in the field. This may lay in the fact that the stars are not exposed on the film as dots of one pixel but rather as small surfaces due to local overexposure. another reason might be that the coc is assumed to be too small. This will be discussed in the chapter coc below. All this allows more room for longer exposure times as this will not cause the dot become a line but rather the circle become a little bit extended to one side. In the field you may double the values calculated in the list above. An effect not looked at is that not all parts of the sky are moving at the same speed relatively to the earth. The last paragraph will discusses this effect.
The tables above show that especially wide angle lenses allow for relatively long exposure times. The relative movement of the projected image on the sensor or film is smaller the larger the opening angle and thus the shorter the focal length of the lens used. It is important to use a lens with a good maximum aperture. This is one of the reasons why I use my fish eye lens for this kind of photography. With its maximum aperture of 2.8 it is one stop faster than my wide angle zoom which is a 17-40mm at f4.0. With the same exposure time the fish eye lens will capture the double amount of light compared the zoom lens. If you have a 50mm fixed focal length lens this will probably have a good maximum aperture. Even though a 50mm lens on a APS-C sensor allows for only 2.5seconds maximum exposure time (have a look at the list above), the 2 stop faster aperture than the zoom (I assumed the 50mm lens will have a aperture of 2.0 which is a normal value) will capture the same amount of light than the zoom in 10seconds exposure time. If you bundle a fast lens with a good sensor, you are well equipped for night photography of the sky. Today's sensors are capable of producing very good results at ISO400 with only marginal quality issues compared to ISO 100.
Dark Frame Substraction
It is important to note that long exposure times will generate excessive noise on the sensor. Even though this is less a problem with more recent sensors and with relatively moderate ISO settings of 400, you should still optimise the exposure. It is therefore recommended to carry out a dark frame subtraction. There are two major ways of doing this. The easiest and most straight forward way is to use the long exposure setting in you camera for noise reduction. This will activate a dark frame exposure after each exposure above a certain time (in my cameras, the Canon 20D, the Canon 5DMK2 and the Leica M8, the limit time for an internal dark frame substractionis one second). The dark frame is an exposure with no light hitting the sensor. The dark frame will then be automatically subtracted by the cameras processing unit. You will end up with a RAW file that already has a dark frame subtraction included.
I would like to add some thoughts about the internal processing when the camera records the RAW file. We have to look into image capturing by digital sensor in some more details. A sensor of lets say 8 Megapixle has 8 Million Pixels. A light sensitive pixel is not able to differentiate between light of different wavelength, i.e. it makes no difference if the light which is hitting the pixel is red or blue. To make the pixel sensitive to colour we have to add a colour filter upon each pixel, one for each of the main three additive colours Red (R) Green (G) and Blue (B), i.e. RGB. To simulate the sensitivity of the human eye which has its highest sensitivity for green light, half of the pixels will get a green filter, a quarter will get red and a quarter will get blue filters. This means that not 8 megapixels will carry the full RGB colour information but only 4 million green, 2 million blue and 2 million red pixels. All this is not valid for the Feavon Sensor which offers three sensors stacked together with true RGB pixels. Let’s go back to the standard sensor. When reading out the RAW file, the information which pixels has captured which colour is still available and this information is required to convert it into a bitmap file with RGB values for each of the 8 million pixels.

This conversion is called Beyer conversion, as the filter matrix with the RGB filters on the sensor is called the Beyer Matrix. The colour information is now calculated for each pixel using the information of the neighbouring pixels. We have only 2 Million Blue pixels and these pixels will give the information for the blue colour channel to 8 million pixels. The noise from each blue pixel will now be calculated onto other pixels depending on the algorithm used in the RAW converter. This is the reason why post processing a dark frame is not accurate, as the noise from each original pixel is already calculated onto other pixels and the original information is not there anymore. It is therefore a very accurate way to carry out the dark frame subtraction in the camera which has all the information required due to the fact that the dark frame subtraction is carried out using RAW data rather then converted data. The drawback is that you have to wait after each exposure for the dark frame reduction to be carried out. My newset Canon camera, the 5DMK2 allows a dark frame to be used for multiple exposures. Up to fice exposures can use the same dark frame. The camera will internally store the 5 pictures and then take a dark frame and sunstracts is from the last 5 stored exposures. In addiion to that, the camera is able to decide whether a dark frame substraction is required or not.
My other camera, the Leica M8 uses a CCD sensor and these sensors are much more prone to show noise. The camera therefore gives you no option whether to take a drak frame or not, it will always internally use a dark frame reduction at exposure times longer than 1 second. The noise for long time exposures is not the same as the noise shown in high ISO short exposures. It is therefore interesing to test a camera for long time exposure times and the noise generated, as the bahaviour could be totally different from that shown for short exposure times and high ISO noise. My M8 actually shows very goog long time exposure noise even though its high ISO performance is not very impressive.
Another option for the dark frame reduction would be that the RAW converter itself would allow a dark frame to be subtracted. To my knowledge there is no such software available today.
Alternatively it is possible to do the subtraction in a post processing step. You also have to capture a dark frame but it is enough to make one for each shooting session. The temperature should stay the same during this session; otherwise you have to carry out another dark frame. In addition to that, then dark frame needs to get the same exposure time at the same ISO settings as the exposure itself. This means that you best settle on one exposure time and one ISO settings during a session. As soon as you change anything, you have to take another dark frame. You may even take multiple dark frames in a row and average them later on to get an even better result. The post processing step is to manually subtract the dark frame (or the average dark frame) from the exposures. Any good astronomy software for astronomy photography can do this. You may use the freeware IRIS for example. As you see, the post processing approach is more complicate and the draw back (at least for me) is that you will not end up with a RAW file anymore but with a bunch of dark frames and original exposures which are then processed to exposures which have the dark frame subtracted. One of the big advantages of the post processing is that you need less dark frames, i.e. you do not have to wait after each shot for the camera to capture the dark frame. The best way is to find out for yourself what fits your workflow best. You will probably start with the in-camera way and if it doesn’t disturb you to wait for the time the camera takes the dark frame you will probably life with it.
Noise Reduction
If you still experience too much noise you may use one of the noise reduction programs such as neat image to clean up your picture. Be careful not to overdo the job as noise reduction goes hand in hand with information destruction. Another possibility is to use the noise reduction offered when converting the RAW picture. There are normally two options: Luminance noise and Colour Noise. Play around with different settings to get the best results. As most RAW converter programs offer a life preview, this is a very intuitive process. The version 3 of Lightroom for example now shows much better noise reduction capability than its predecessor.
A better way is to take multiple exposures from the same object and stack them upon each other. As noise is a stochastic process, the noise pattern will be different on each exposure and therefore it helps to average multiple exposures. Be careful when stacking the pictures, as the sky has moved and the information will be in a different location for each exposure. It is therefore required to align the single exposures prior to stacking. To to this manually is rather complicate; there is special astronomy software available to do this, but some HDR (high dynamic range) softwares are also capable of doing the aligning and the stacking.
The table above shows values for a rule of thumb in its last column. This rule of thumbs tells us that the maximum exposure time is equal to 600 divided by the focal length of the lens used. While the rule of thumb gives quite good values for the film it is not useable for the APS-C sensor anymore. A rule of thumb of 100 divided by the focal length would give good values but for the longer exposure times measured in the field 200 divided by the focal length makes more sense.


Circle of Confusion
It is important to note that all calculations are carried out for the maximum enlargement from the information captured by the sensor or film. If you decide that you will only show your picture on the web or if you intend to make only small prints it is possible to go for longer exposure times which will result in unsharp pictures at its maximum enlargement but will be still be sharp for the smaller enlargement intended. One way to get an idea of how much longer you may expose is to calculate the maximum enlargement from you sensor or film. Use 240..300dpi for the print resolution to calculate the size out of the pixels given by the sensor. For film, the maximum enlargement is A4..A3 without empty enlargement (which means that you enlarge without getting more information on the enlargement). You then devide the intended size you are heading for through the maximum size. If you go 4 times smaller, you may expose the double of the time calculated above. If you go 16 times smaller you may expose 4 times longer and so on.
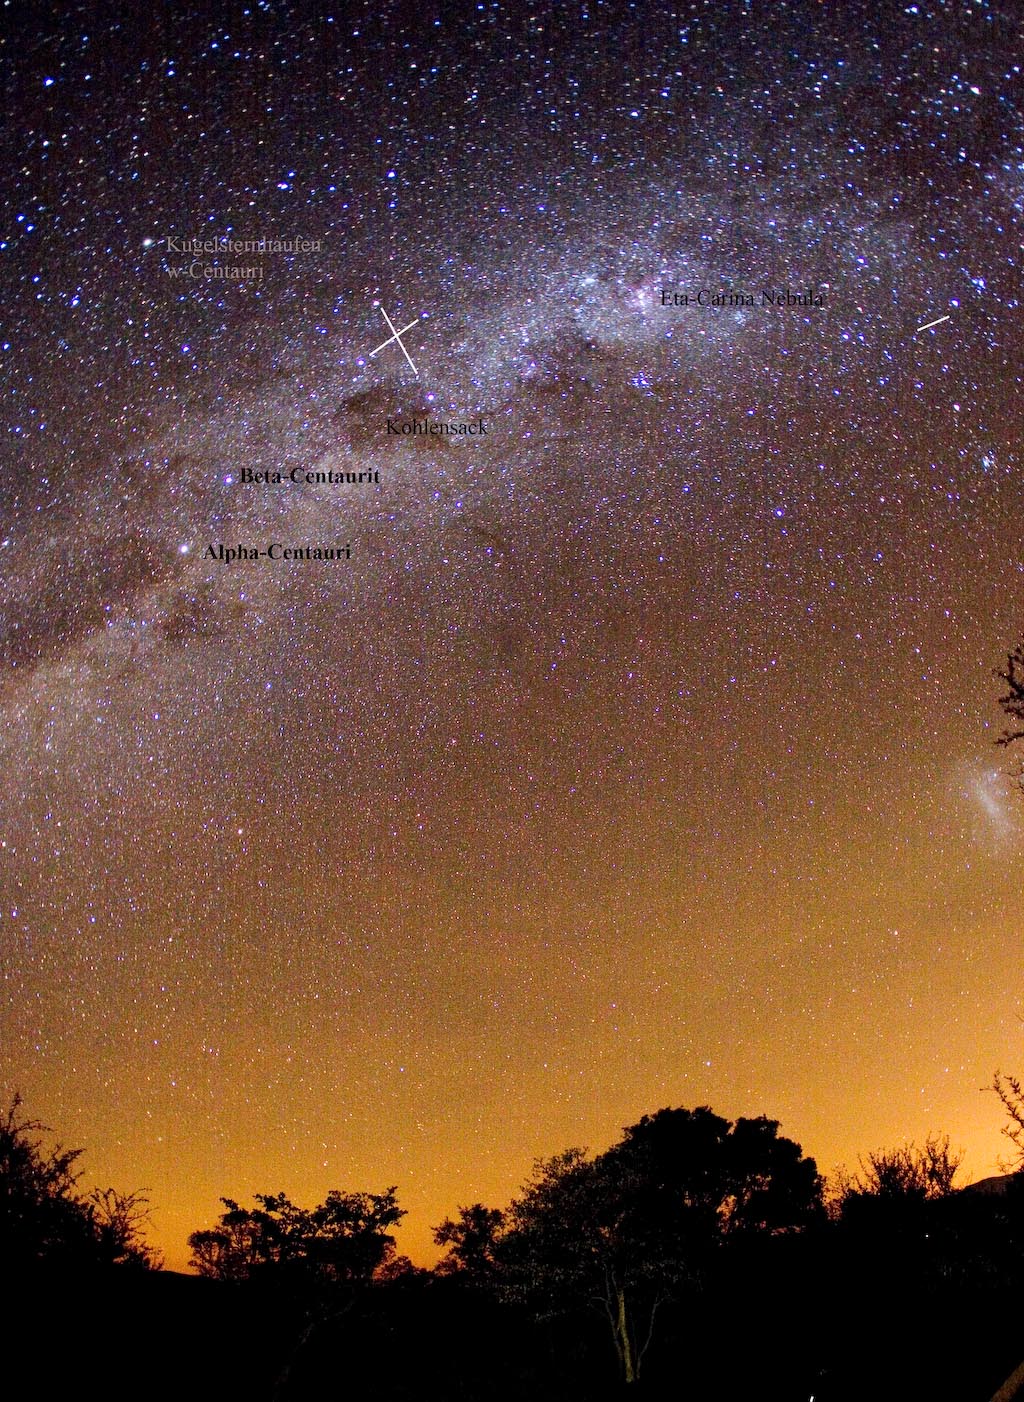
The exposure below was exposed 60 seconds rather than the 20seconds experienced as optimal for maximum enlargement. As the picture is shown relatively small on the web, you will not note any unsharpness.
Let's have a closer look at where the coc for film comes from. It is actually not a value based on film resolution but rather on enlargement. For medium and large format cameras, a larger coc is used to calculate the depth of field, even though the film emulsion used is the same as for the 35mm film. This shows, that the coc value is based not on the film resolution but rather on a typical enlargement size and a typical viewing distance of that enlargement. It is assumed, that the closest comfortable viewing distance is 25cm. At that distance, the human eye can resolve approximately 5 lines per mm, which is equal to a coc of 0.2mm. A comfortable viewing distance is also one, where the viewing angle would be approximately 60°, which is equivalent to 29cm at 25cm viewing distance, which is approximate a format of A4 (or 8" by 10"). If your negative is already that size, the coc is equal to 0.2mm. If your negative is smaller, the coc is smaller accordingly. The diagonal dimension of a 35mm negative (which is 43mm) needs to be enlarged 7 times to be 30cm, which is equivalent to a coc of 0.03mm. If the same basis is used for digital sensors, the whole calculation is only dependent on the crop factor and not on the number of pixels.

A limiting factor for the maximum coc diameter is not only the sensor resolution but also the lens used and the anti aliasing filter in front of the sensor, which reduced Moiré effects but also reduces the resolution of the sensor itself. Canon uses (as almost all DSLR producers do) an anti aliasing filter. Leica on the other hand does not use such a filter on the M8 (and the M9). And the resolution of the lens itself will probably be not better than 0.01mm, at least that's the value given for some good Leica lenses, and these are probably the best lenses available. If you have a look at the MTF curves of lenses you will note that the values for 40lines per mm, which corresponds to a coc of 0.025, have already much reduced contrast. It therefore makes not sense, to calculate with a too small coc. The tables below show exposure time values based on crop factors only and you will find that these values are better in line with the values measured in practise.


The elevation of the stars
As mentioned above, the stars movement is dependent on the angular distance from the poles, the declination angle. If you take a picture of the polar star alone, the exposure time would be not limited if the polar star would be exactly at the sky’s pole. On the other hand, the stars on the celestial equator show the highest relative movement. If you take a picture, you have to consider the stars with the highest relative speed in your picture, i.e. it depends on the opening angle of your lens if you also capture stars with higher relative speed. In the table below you'll find maximum exposure times for stars dependent on the declination. The fields which are marked grey do not really make sense, as the opening angle of the lens is larger than the declination angle (or exactly as 90° minus the declination angle).


